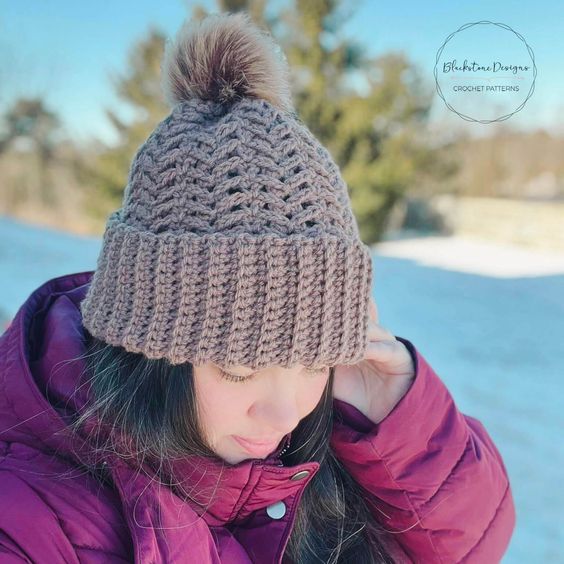
Crochet Herringbone Hat – Free Pattern
Create a stylish hat using the herringbone crochet stitch. This unique stitch adds texture and visual interest to the hat, making it a fashionable accessory for any outfit. The herringbone stitch creates a subtle chevron pattern that gives the hat a modern and sophisticated look. Choose a soft, cozy yarn in your favorite color to make a hat that is both stylish and comfortable to wear. Whether you are a beginner looking to learn a new stitch or an experienced crocheter wanting to try something different, this pattern is sure to keep you engaged. The herringbone stitch may look complex, but with a little practice, you'll be able to create a beautiful hat that will impress everyone who sees it. So grab your crochet hook and yarn, and get ready to make a trendy herringbone hat that you'll love to wear all season long.
Materials
Worsted Weight Yarn (#4)
- Baby (2oz/132yds)
- Toddler (2.5oz/165yds)
- Child (3oz/197yds)
- Small Adult (3.5oz/230yds)
- Large Adult (4oz/263yds)
H/8/5.00mm Hook
Yarn Needle
Scissors
Optional Materials:
Pom pom
Gauge
19 herringbone sts x 20 rows = 4.5”
15 ribbed rows = 4”
Sizes
Size (Head Circumference):
Baby (14-16”) [36-40cm]
Toddler (16-18”) [41-46cm]
Child (18-20”) [46-51cm]
Small Adult (21-22”) [53-56cm]
Large Adult (23-24”) [58.5-61cm]
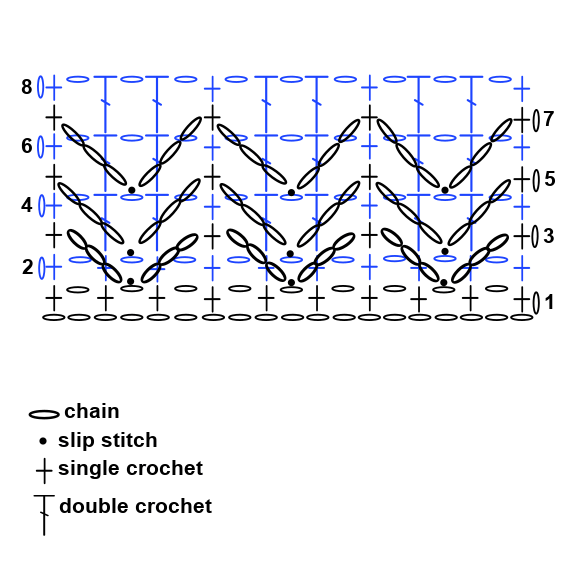
Stitch Guide
BLO = back loop only
ch = chain
dc = double crochet
sc = single crochet
sl st(s) = slip stitch(es)
Skill Level
Intermediate
Written in U.S. Terms
Notes
- Beginning chains do not count as stitches.
- This hat is worked from bottom to top, starting with the ribbed brim.
- Where asterisks appear, repeat the instructions between them.
- Pattern is written for smallest size with larger sizes in parentheses.
- To work a gauge swatch, chain 20 then work the hat body portion from the pattern below for 20 total rows.
- Important: When working slip stitches in ch-1 spaces, make sure to work over the front of the fabric and not around the whole piece (which would cinch the fabric).
- “2 rows below” will always be an even number row during repeat rows. For example, from R5 you will work into R2, from R7 you will work into R4
Instructions
RIBBED BRIM
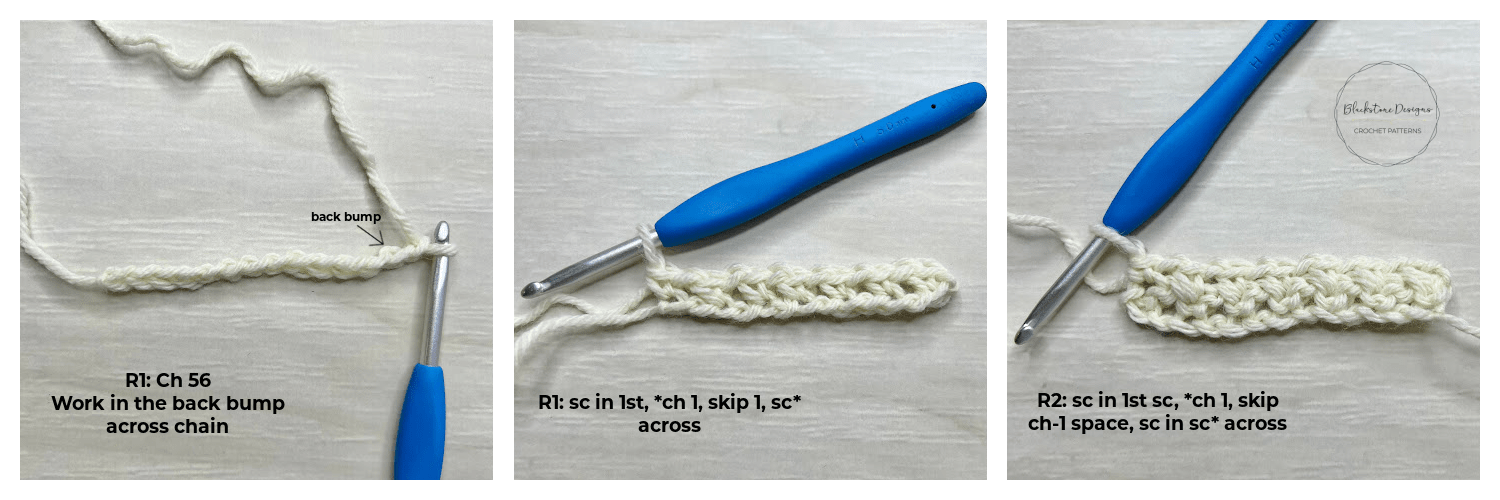
R1. Ch 13(15,17,19,19), sc in 2nd ch from hook and across, turn
R2. Ch 1, BLO sc in each st across, turn
R3-55(61,67,73,79). Repeat R2; Move to Hat Body
R56(62,68,74,80). Ch 1, sc in the end of each row across the brim (55)[61,67,73,79]; Move to Hat Body
HAT BODY
R1. Ch 1, sc in 1st sc, *ch 1, skip 1, sc in next sc* across, turn (28 sc, 27 ch-1)[31 sc, 30 ch-1 // 34 sc, 33 ch-1 // 37 sc, 36 ch-1 // 40 sc, 39 ch-1]
R2. Ch 1, sc in 1st sc, *ch 1, skip ch-1 space, sc in sc* across, turn (28 sc, 27 ch-1)[31 sc, 30 ch-1 // 34 sc, 33 ch-1 // 37 sc, 36 ch-1 // 40 sc, 39 ch-1]
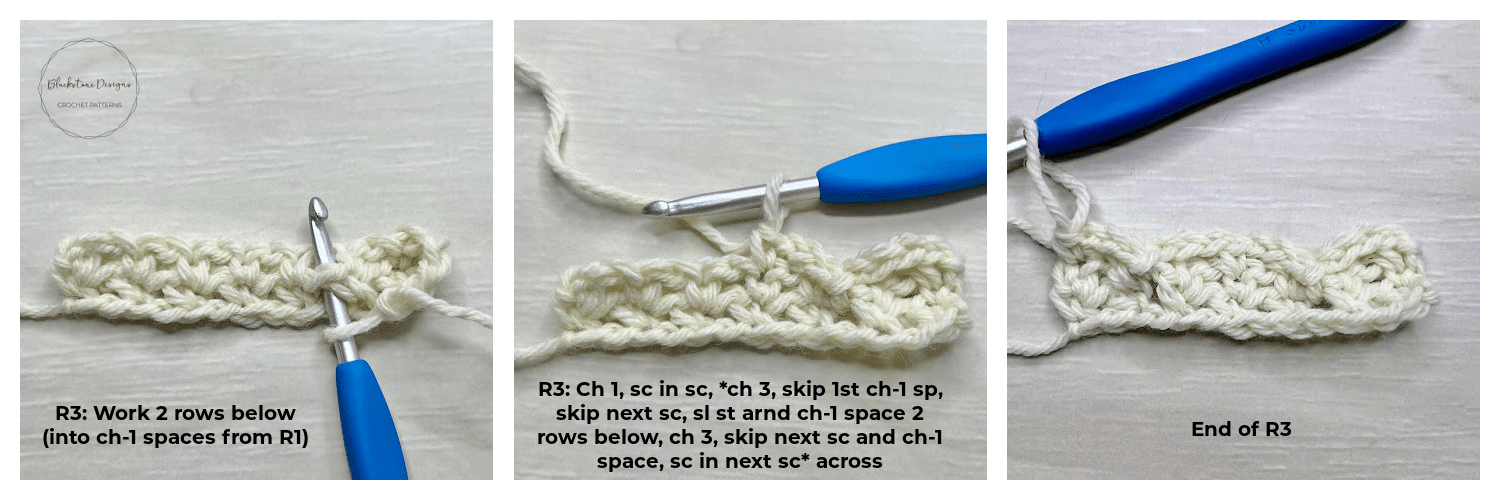
R3. Ch 1, sc in 1st sc, *ch 3, skip next ch-1 space and sc, sl st in next ch-1 space 2 rows below, ch 3, skip next sc and ch-1 space, sc in next sc* across, turn (9 Hb, 10 sc)[10 Hb, 12 sc // 11 Hb, 14 sc // 12 Hb, 16 sc // 13 Hb, 18 sc)
R4. Ch 1, sc in 1st sc, *ch 1, skip ch-1 space, (dc in next sc behind ch-3, ch 1, skip ch-1 space) 2X, sc in next sc* across, turn (10 sc, 18 dc, 27 ch-1)[11 sc, 20 dc, 30 ch-1 // 12 sc, 22 dc, 33 ch-1 // 12 sc, 24 dc, 36 ch-1 // 13 sc, 26 dc, ch-1]

R5. Ch 1, sc in 1st sc, *ch 3, skip next ch-1 space and dc, sl st in next ch-1 space 2 rows below, ch 3, skip next dc and ch-1 space, sc in next sc* across, turn (9 Hb, 10 sc)[10 Hb, 12 sc // 11 Hb, 14 sc // 12 Hb, 16 sc // 13 Hb, 18 sc)
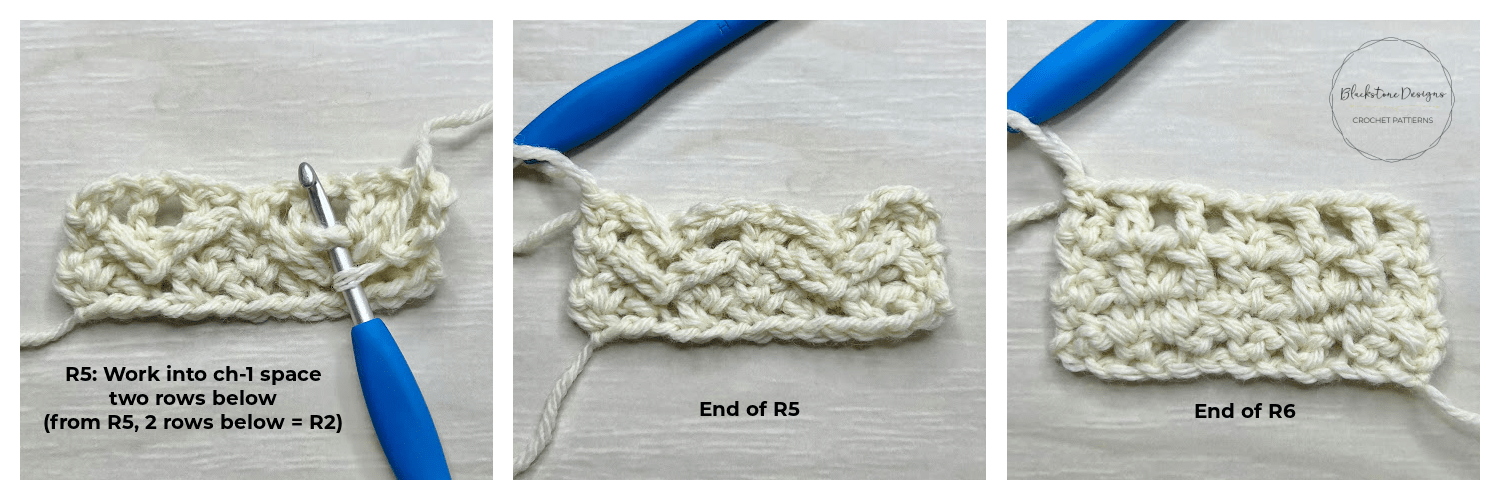
R6. Ch 1, sc in 1st sc, *ch 1, skip ch-1 space, (dc in next dc, ch 1, skip ch-1 space) 2X, sc in next sc* across, turn (10 sc, 18 dc, 27 ch-1)[11 sc, 20 dc, 30 ch-1 // 12 sc, 22 dc, 33 ch-1 // 12 sc, 24 dc, 36 ch-1 // 13 sc, 26 dc, ch-1]
R7-23(25,27,29,31). Repeat R5-6, ending with an R5 repeat; Fasten at the end of R23(25,27,29,31).
Finishing
- With the wrong side facing out: Weave tail in and out of dcs and scs, pull tight to cinch; place several stitches around the top to sew closed.
- Line up each row down the open edge and sew to seam together.
- Flip right side out and attach pom pom to the top if desired.
- Roll up brim.
- Hide all strings.