Crochet Plush Cat Amigurumi Free Pattern
Create your very own adorable amigurumi cat plush using the art of crochet. This project involves using a crochet hook and yarn to craft a cute and cuddly feline friend. By following a pattern and using basic crochet stitches, you can bring this charming cat to life. The process of crocheting an amigurumi cat allows you to customize the colors, size, and details to make it uniquely yours. Whether you're a beginner or an experienced crocheter, making a plush cat amigurumi is a fun and rewarding project that will bring joy to anyone who receives it. The intricate details and soft texture of the yarn make this project a delightful sensory experience. As you work on each stitch, you'll see the cat plush slowly take shape, from its tiny ears to its fluffy tail. Once completed, your amigurumi cat can be displayed as a charming decoration or given as a thoughtful gift to a fellow cat lover. So grab your crochet hook and yarn, and let your imagination run wild as you bring this adorable plush cat to life through the art of crochet.
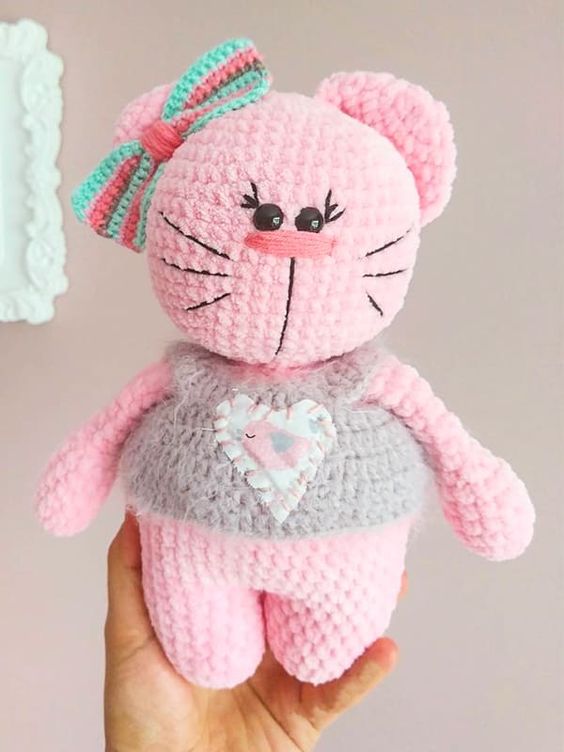
Materials
Yarn: Himalaya dolphin baby
Crochet hook: 4 mm
Safety eyes 10 mm
Abbreviations
MR- Magic ring
Sc- Single crochet
Inc- Increase
Dec- Decrease
Head
Rnd 1. 6 sc in MR (6)
Rnd 2. 6 inc (12)
Rnd 3. (sc,inc) (18)
Rnd 4. (2sc, inc) (24)
Rnd 5. (3sc inc) (30)
Rnd 6. (4sc inc) (36)
Rnd 7. (5sc inc) (42)
Rnd 8. (6sc inc) (48)
Rnd 9-13. 48 sc (48)
Rnd 14. (6sc dec) (42)
Rnd 15. (5sc dec) (36)
Rnd 16. (4sc dec) (30)
Rnd 17. (3sc dec) (24)
Rnd 18. (2sc dec) (18)
Rnd 19. (sc,dec) (12)
We cut our rope by leaving it long Note=we attach the eyes between 11-12 rows by leaving a loop in between. Ear (2pcs)
Ears (Make 2)
Rnd 1. 6 sc in MR (6)
Rnd 2. 6 inc (12)
Rnd 3. (sc, inc)*6 (18)
Rnd 4. (2sc, inc)*6 (24)
Rnd 5. (3sc, inc)*6 (30)
Let’s close the two ends and leave a long rope.
Pointed ears (optional)
Rnd 1. 5sc in MR (5)
Rnd 2. 5 inc (10)
Rnd 3. (sc,inc)*5 (15)
Rnd 4. (2sc,inc)*5 (20)
Rnd 5. (3sc,inc)*5 (25)
Fold and crochet the edges together.
Arms (Make 2)
Rnd 1. 6sc in MR (6)
Rnd 2. 6 inc (12)
Rnd 3-6. 12 sc (12)
Rnd 7. 3 dec (6)
Rnd 8-16. 9 sc (9)
We stuff so that there is no stuffing at all closer to the shoulder, fold and flashing.
Legs
Rnd 1. 6sc in MR (6)
Rnd 2. 6 inc (12)
Rnd 3. (1sc,inc) (18)
Rnd 4-8. 18 sc (18)
After crocheting the second leg, let’s connect the first leg with 2 chains without breaking the rope and start crocheting the body.
Body
Rnd 9-12. 40 sc
Rnd 13. make an increase on both sides (44)
Rnd 14. make an increase on both sides (46)
Rnd 15. make an increase on both sides (48)
Rnd 16-18. 48 sc
Rnd 19. (6sc,dec) (42)
Rnd 20. (5sc,dec) (36)
Rnd 21. (4sc,dec) (30)
Rnd 22. (3sc,dec) (24)
Rnd 23. (2sc,dec) (18)
Rnd 24. (1sc,dec) (12)
Tail
Rnd 1. 6sc in MR (6)
Rnd 2-9. 6sc
Fold and crochet, fasten and leave a long thread for sewing.
I made the elephant for my son-in law. We have an on going argument that elephants exist. He loved it. Ears were a little bit of a challenge to get placed, but they turned out very cute. Thanks for the access to one of your great patterns.
You’re welcome ☺️
Thank you for so many wonderful patterns to make. Do you have a newsletter or a blog? Thanks 😊