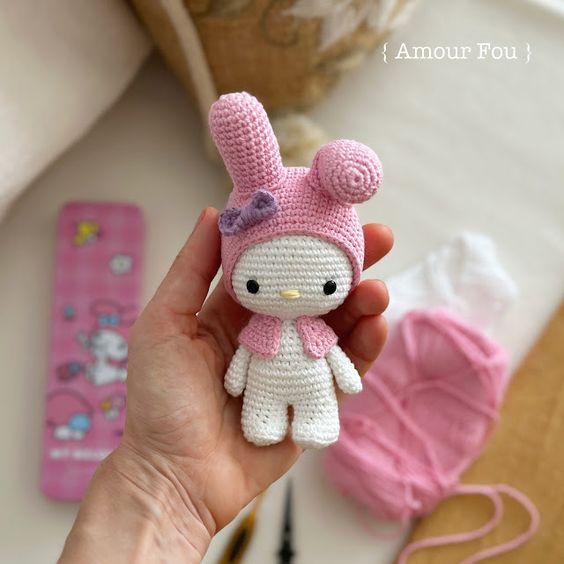
Crochet Melody The Bunny
Introducing the adorable creation known as Melody The Bunny, a charming crochet masterpiece that is sure to capture the hearts of all who lay eyes on her. This handcrafted bunny is lovingly made with intricate crochet stitches, giving her a unique and whimsical appearance that is simply irresistible. With her soft pastel colors and delicate features, Melody exudes a sense of warmth and comfort that makes her the perfect companion for both children and adults alike. Each stitch in Melody The Bunny's design is carefully crafted to perfection, ensuring that she is not only beautiful to look at but also durable enough to withstand hours of playtime. Her floppy ears and fluffy tail add a touch of playfulness to her overall look, making her a delightful addition to any collection of stuffed animals. Whether displayed on a shelf or snuggled up in bed, Melody The Bunny is sure to bring joy and happiness to all who welcome her into their lives.
Abbreviations (US Terms)
You will need: White, light pink, a bit of lilac and a tiny bit of light yellow yarn. I’ve used 100% cotton yarn (8/4 - Fingering).
Leg 1
10. Crochet *13 sc, 2 sc in the next st*, repeat * twice (30)
11. to 13. Crochet 30 sc
14. Crochet *3 sc, one decrease*, repeat * (24)
Start stuffing the body firmly…
15. to 17. Crochet 24 sc
18. Crochet 1 sc, one decrease, *2 sc, one decrease*, repeat * 5 times, 1 sc (18)
19. Crochet 18 sc
20. Crochet *1 sc, one decrease*, repeat * (12)
Stuff some more…
21. Crochet 2 sc in each st (24)
22. Crochet *1 sc, 2 sc in the next st*, repeat * (36)Stuff the neck area firmly…
23. Crochet *2 sc, 2 sc in the next st*, repeat * (48)
24. to 37. Crochet 48 sc
Place safety eyes between rounds 26 and 27, with a distance between them of 9 stitches…
38. Crochet 3 sc, one decrease, *6 sc, one decrease*, repeat * 5 times and finally 3 sc (42)
39. Crochet *5 sc, one decrease*, repeat * (36)
40. Crochet 2 sc, one decrease, *4 sc, one decrease*, repeat * 5 times and finally 2 sc (30)
Start stuffing the head…
41. Crochet *3 sc, one decrease*, repeat * (24)42. Crochet 1 sc, one decrease, *2 sc, one decrease*, repeat * 5 times, 1 sc (18)43. Crochet *1 sc, one decrease*, repeat * (12)44. Crochet 6 decreases (6)
Fasten off yarn and weave in ends.
Arms
Make two, using white…
1. Chain 2. Crochet 4 sc in the second chain from hook.
2. Crochet 2 sc in each stitch (8)
3. to 10. Crochet 8 scNo need to stuff the arm…11. Press the opening with your fingers, aligning 4 stitches side by side and sc together the corresponding stitches, 1 sc into each pair of stitches.
Fasten off yarn, leaving a long tail to sew the arms to the body.
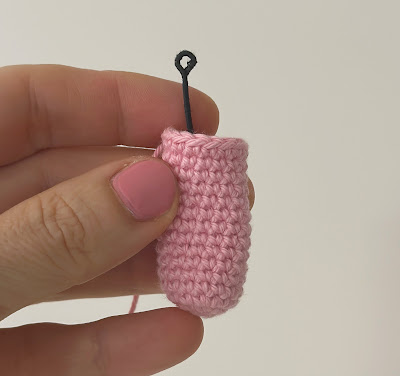
Tail
Using white…
1. Magic ring of 6 sc
2. Crochet 2 sc in each st (12)
3. Crochet 12 sc
4. Crochet 6 decreases (6)
Fasten off yarn, leaving a long tail to sew to the back of the body.
Small cape
Using pink…
The cape is not crocheted in rounds but in rows.
1. Leaving a long initial tail (you’ll use it to sew the cape around the neck), chain 23 ch stitches. Starting from the second ch from hook, crochet 1 sc in each ch stitch (22 sc).
2. Chain 1 and turn. Crochet 2 sc in the next st (increase), 20 sc and then another increase (24).
3. Chain 1 and turn. Crochet 1 increase, 22 sc and then another increase (26).
4. Chain 1 and turn. Crochet 1 increase, 24 sc and then another increase (28).
For a tidier finish, chain 1 to turn the piece 90 degrees clockwise and crochet 4 sc along the side of the cape, working in the spaces between rows. When you reach the top edge, crochet 22 sc in the remaining loops of the foundation chain. Then chain 1 to turn the piece 90 degrees clockwise again and crochet 4 sc along the other side of the piece, once again working in the spaces between rows.
Fasten off yarn and weave in ends.
Hood
Using pink…
1. Magic ring of 6 sc
2. Crochet 2 sc in each st (12)
3. Crochet *1 sc, 2 sc in the next st*, repeat * (18)
4. Crochet 1 sc, 2 sc in the next st, *2 sc, 2 sc in the next st*, repeat * 5 times, 1 sc (24)
5. Crochet *3 sc, 2 sc in the next st*, repeat * (30)
6. Crochet 2 sc, 2 sc in the next st, *4 sc, 2 sc in the next st*, repeat * 5 times, 2 sc (36)
7. Crochet *5 sc, 2 sc in the next st*, repeat * (42)
8. Crochet 3 sc, 2 sc in the next st, *6 sc, 2 sc in the next st*, repeat * 5 times, 3 sc (48)
9. Crochet *7 sc, 2 sc in the next st*, repeat * (54)
10. to 21. Crochet 54 sc
22. Crochet *7 sc, one decrease*, repeat * (48)
Fasten off yarn, leaving a long tail to sew to the head.
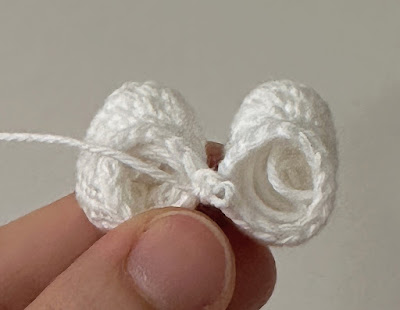
Ears
Make two, using pink…
1. Magic ring of 6 sc
2. Crochet 2 sc in each st (12)
3. Crochet *1 sc, 2 sc in the next st*, repeat * (18)
4. to 18. Crochet 18 sc
Fasten off yarn, leaving a long tail to sew to the hood.
2. and 3. Chain 1 and and turn. Crochet 6 sc.
Use the same lilac yarn to tie several rounds of yarn in the middle and finish with a knot.