Crochet Bath Pouf
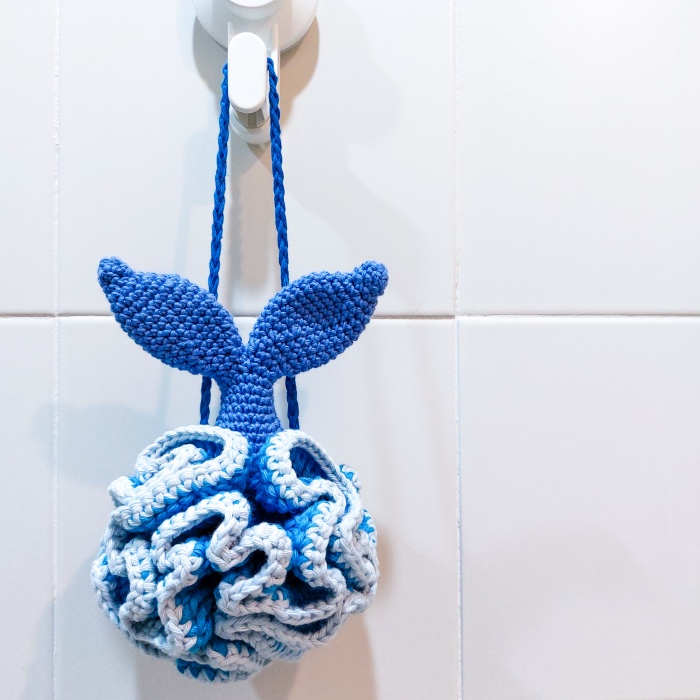
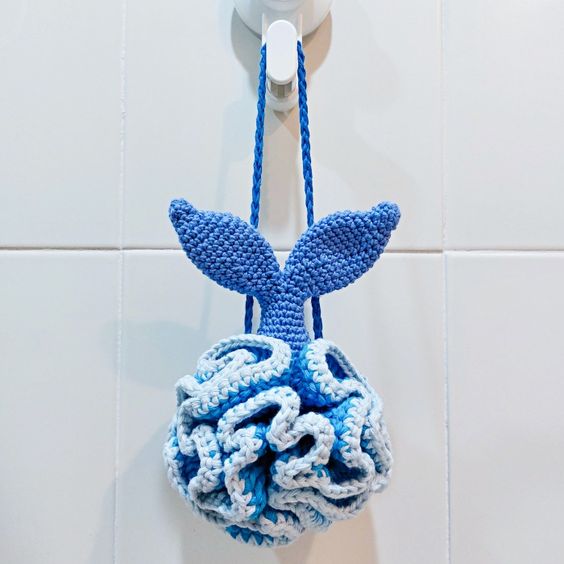
Elevate your bathing experience with a handmade bath pouf crafted using the art of crochet. This luxurious bath accessory is perfect for creating a rich lather and gently exfoliating your skin, leaving you feeling refreshed and rejuvenated after every shower. The intricate crochet design adds a touch of elegance to your bathroom decor, making it both functional and stylish. The versatility of this bath accessory allows you to customize it to your preferred size and color, making it a unique addition to your daily self-care routine. Treat yourself to a spa-like experience at home with a crochet bath pouf that is both practical and aesthetically pleasing.
WHAT YOU WILL NEED
- #4 cotton yarn (I used Dapper Dreamer 10-ply combed cotton)
- 4.5 mm crochet hook
- Scissors
- Darning needle
ABBREVIATIONS
- CH – chain
- SC – single crochet
- DC – double crochet
- SL ST – slip stitch
- ST(S) – stitch(es)
PATTERN NOTES
- You are free to use as many colors as you want. It’s up to you where and when you want to switch colors.
- If you’re familiar with making amigurumi, you can sew an amigurumi animal head or (in my case) a tail to give the bath pouf some character, especially if you’re gifting it to a kid.
- Here’s my tutorial for a crochet whale tail. (Instead of sewing the opening shut for this bath pouf, I extended it for more rounds and stuffed it.)
PATTERN
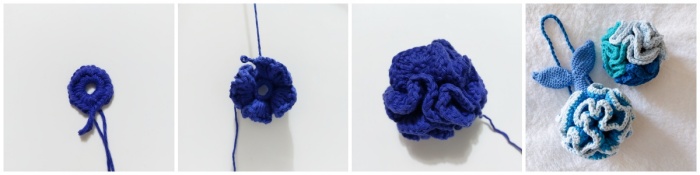
R1: Start with a magic circle, then work SC25 in the circle. Tug at the end of the yarn to tighten the circle. It’s okay if it doesn’t close completely. SL ST into the first SC. (25 STS)
R2: CH3 (counted as first DC). In the same ST, work DC3. For the rest of the round, work DC4 in each ST. SL ST into the third CH. (100 STS)
R3: CH3 (counted as first DC). In the same ST, work DC2. For the rest of the round, work DC3 in each ST. SL ST into the third CH. (300 STS)
R4: CH3 (counted as first DC). In the same ST, work DC1. For the rest of the round, work DC2 in each ST. SL ST into the third CH. (600 STS)
R5 (optional edging): CH1, and work SC1 into each stitch. SL ST into CH1 and fasten off.