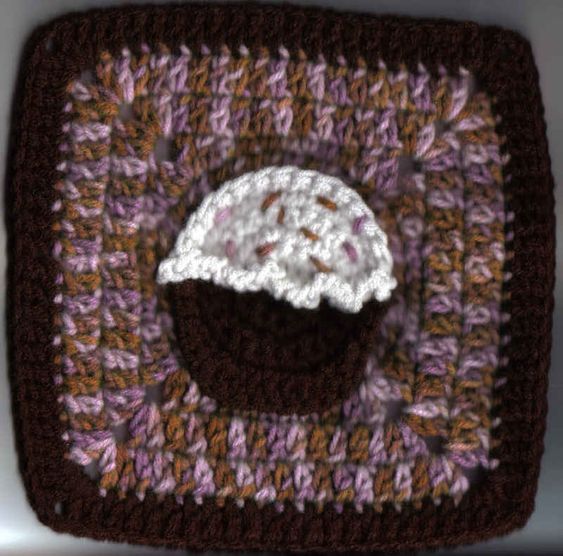
Crochet Cupcake Square
Create a charming cupcake-inspired square using the art of crochet. This delightful design combines the intricate stitches of crochet with the sweet and whimsical shape of a cupcake. By following a pattern that incorporates various crochet techniques, you can bring this adorable square to life. Choose yarn in vibrant colors to mimic frosting and sprinkles, adding a playful touch to your crochet project. Whether you're a beginner or an experienced crocheter, this project offers a delightful challenge that will result in a charming addition to your collection of crocheted items. Let your imagination run wild as you experiment with different colors and textures to make your cupcake square truly one-of-a-kind.
Materials:
Worsted Weight yarn in 3 different colors
(Color A= CA, Color B= CB, Color C= CC)
Size H hook (5.00mm)
Stitch Marker
Yarn Needle (to weave in ends)
Finish Size: 8”h x 8”w
Different Stitches:
Extended Double Crochet (EDC)-Yarn over, insert hook in specified st, yarn over, draw up a loop, yarn over, draw thru one loop, yarn over, draw thru two loops, yarn over, draw thru last two loops.
Notes:
Do not work in any of the joining slip stitches (sl st).
Cupcake is worked with 2 colors at the same time. When doing color changes do not finish off unless instructed to.
Color Changing: Insert hook in next st, yarn over, draw up loop, yarn over with different color and pull thru both loops on hook.
Directions:
Rnd 1: With CA ch2, 3 sc in 2nd chain from hook color changing to CB when doing 3rd sc, 3 sc in same chain, join with sl st to first sc, ch1 and turn.
(6sc)
Mark Rnd 1 as right side.
Rnd 2: 2 sc in each of the next 3 sts color changing to CA when doing 6th sc, 2 sc in each of the next 3 sts, join with sl st to first sc, ch1 and turn.
(12sc)
Rnd 3: [2 sc in next st, 1 sc in next st] Do this 2 times, 2 sc in next st, 1 sc in next st color changing to CB, [2 sc in next st, 1 sc in next st] Do this 3 times, join with sl st to first sc, ch1 and turn.
(18sc)
Rnd 4: [2 sc in next st, 1 sc in each of the next 2 sts] Do this 2 times, 2 sc in next st, 1 sc in next st, 1 sc in next st color changing to CA, [2 sc in ext st, 1 sc in each of the next 2 sts] Do this 3 times, join with sl st to first sc, ch1 and turn.
(24sc)
Rnd 5: [2 sc in next st, 1 sc in each of the next 3 sts] Do this 2 times, 2 sc in next st, 1 sc in each of the next 2 sts, 1 sc in next st color changing to CB, [2 sc in next st, 1 sc in each of the next 3 sts] Do this 3 times, join with sl st to first sc, ch1 and turn.
(30sc)
Rnd 6: 1 sc in back loop of each of the next 14sts, 1 sc in back loop of next st when finishing sc pull up both colors, drop CB loop. With CA 1 sc in back loop of each of the next 3 sts, 1 hdc in back loop of each of the next 2 sts, 3 dc in back loop of next st, 1 dc in back loop of each of the next 3 sts, 3 dc in back loop of next st, 1 hdc in back loop of each of the next 2 sts, 1 sc in back loop of each of the next 3 sts, join with sl st to first sc.
(21sc, 4 hdc, 9dc) (34sts total)
Finish off CA.
Note: The ruffle is worked in the center into the side of sc on CB side. But only on the surface of the stitch. Here's a Diagram:
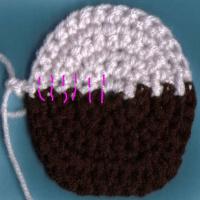
Ruffles: Insert hook back in dropped loop and make sure right side of square is facing you. Ch2, sl st in side of sc you first come to, [Ch2, sl st into side of next sc] Do this 11 times, finish off.
Note: Rnd 7 is worked in the free back loops, from working Rnd 6 on the wrong side of cupcake. Do not work in any of the ssc, hdc, dc made from working Rnd 6.
Rnd 7: With right side facing join CC (leaving a long endfor later embroidering) with sl st to first free back loop on Frosting Part opposite from where you finish off, ch2, 1 dc in same back loop, 1 dc in each of the next 2 back loops, [2 dc in next back loop, 1 dc in each of the next 2 back loops] Do this 9 times, 1 dc in same back loop as first dc, join with sl st to first dc.
(40dc) (ch2 does not count as dc)
Note: On Rnd 8 you will be working through the back loop of stitches on the bottom part of cupcake as well as stitches on Rnd 7 at the same time. Only work in the cupcake back loops when instructed to. This will keep the bottom part of the cupcake down and from curling.
Rnd 8: Ch1, 1 sc in same st as joining, 1 sc in next st, 1 hdc in next st, 1 dc in next st, (1 EDC, ch3, 1 EDC) all in next st, [1 dc in next st, 1 hdc in next st, 1 sc in each of the next 5 sts, 1 hdc in next st, 1 dc in next st, (1 EDC, ch3, 1 EDC) all in next st] Do this 2 times, 1 dc in next st, 1 hdc in next st going thru back loop of 7th st on cake part, [1 sc in next st going thru back loop of next dc on cake part] Do this 5 times, 1 hdc in next st going thru back loop of next dc, 1 dc in next st, (1 EDC, ch3, 1 EDC) all in next st, 1 dc in next st, 1 hdc in next st, 1 sc in each of the next 3 sts, join with sl st to first sc.
(20sc, 8 hdc, 8dc, 8 EDC, 4-ch3 spaces) (44 sts total)
Rnd 9: Ch2, 1 dc in same st as joining, 1 dc in each of the next 4 sts, (2 dc, ch2, 2 dc) all in next ch3 space, [1 dc in each of the next 11 sts, (2 dc, ch2, 2 dc) all in next ch3 space] Do this 3 times, 1 dc in each of the next 6 sts, join with sl st to first dc.
(60dc, 4-ch2 spaces) (Ch2 does not count as dc)
Rnd 10: Ch2, 1 dc in same st as joining, 1 dc in each of the next 6 sts, (2 dc, ch2, 2 dc) all in next ch2 space, [1 dc in each of the next 15 sts, (2 dc, ch2, 2 dc) all in next ch2 space] Do this 3 times, 1 dc in each of the next 8 sts, join with sl st to first dc.
(76dc, 4-ch2 spaces) (Ch2 does not count as dc)
Finish off.
Rnd 11: Join CA with sl st to any ch2 space, Ch3, (1dc, ch2, 2 dc) all in same ch2 space, [1 dc in each of the next 19 sts, (2 dc, ch2, 2 dc) all in next ch2 space] Do this 3 times, 1 dc in each of the next 19 sts, join with sl st to top of beginning ch3.
(92dc, 4-ch2 spaces) (Ch3 counts as dc)
Finish off and weave in all ends except for long end from joining CC.
With long end embroider sprinkles onto Frosting Part of cupcake.