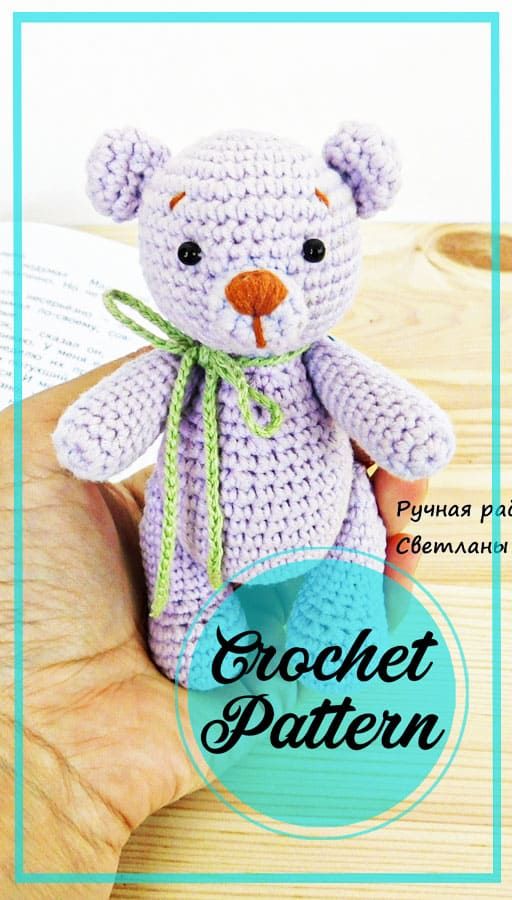
Crochet Little Amigurumi Teddy Bear
Create your very own adorable amigurumi teddy bear using the art of crochet. This project involves using a small hook and yarn to meticulously craft each part of the bear, from its tiny ears to its fluffy tail. By following a pattern and using basic crochet stitches, you can bring this charming little bear to life. Crocheting a little amigurumi teddy bear is a fun and rewarding experience that allows you to showcase your creativity and attention to detail. You can customize the bear by choosing different colors of yarn, adding accessories like a bow or scarf, or even giving it a unique facial expression. Whether you're a beginner or an experienced crocheter, this project is a great way to hone your skills and create a timeless keepsake that can be cherished for years to come.
Necessary materials:
- Knitting yarn (of any composition, preferably semi-cotton).
- Beads for eyes (or eyes on a safety mount).
- Multicolored small buttons for decorating dolls’ clothes.
- Hook No. 1.5 – 2.0
- Filler for toys (synthetic winterizer, synthetic fluff, or holofiber).
Head.
We’re in a separate detail, we start from the top of the top.
1. 6 sc in MR
2 p. inc x 6 time = 12 sc
3 p. (1 sc, inc) x 6 time = 18 sc
4 p. (2 sc, inc) x 6 time = 24 sc
5 p. (3 sc, inc) x 6 time = 30 sc
6 p. (4 sc, inc) x 6 time = 36 sc
7 – 14 p. (8 rows) 36 sc
15 p. (4 sc, dec) x 6 time = 30 sc
16 p. (3 sc, dec) x 6 time = 24 sc
17 p. (2 sc, dec) x 6 time = 18 sc
Body
1. 6 sc in MR
2 p. inc х 6 time = 12 sc
3 p. (1 sc, inc) x 6 time = 18 sc
4 p. (2 sc, inc) x 6 time = 24 sc
5 p. (3 sc, inc) x 6 time = 30 sc
6 p. (4 sc, inc) x 6 time = 36 sc
7 – 12 p. (6 rows) 36 sc
13 p. (4 sc, dec) x 6 time = 30 sc
14 p. 30 sc
15 p. (3 sc, dec) x 6 time = 24 sc
16 – 18 рp. 24 sc
19 p. (2 sc, dec) x 6 time = 18 sc
20 p. 18 sc
Leave the long end of the thread to sew the head.
Hands
1. 6 sc in MR
2 p. inc x 6 time = 12 sc
3 – 14 p. (12 rows) 12 sc
15 p. dec x 6 time
Pull the loops, cut the thread on one handle and hide it inside the part, leave on the otherlong end of the thread for sewing on the part.
Ears.
1. 6 sc in MR
2 p. inc x 6 time = 12 sc
3 p. 12 sc
4p. (sc, dec) x 4 times = 8 sc
Leave the long end of the thread for sewing on the part.
Spout
1. 6 sc in MR
2 p. inc x 6 time = 12 sc
3 p. 12 sc
4p. 12 sc
Leave the long end of the thread for sewing on the part.
Legs.
Dial a chain of 6ch. We begin to knit from the 2nd loop from the hook.
1 p. 4 sc, 3 sc in 1 loop, 3 sc, inc = 12 sc
2 p. inc, 3 sc, 3 inc in a row, 3 sc, 2 inc in a row = 18 sc
3 p. sc, inc, sc, inc, 4 sc, inc, sc, inc, sc, inc, 4 sc, inc, sc, inc = 24 sc
4 – 6 p. 24 sc
7 p. 6 sc, 6 dec in a row, 6 sc = 18 sc
8 p. 18 sc
9 p. 6 sc, 3 dec in a row, 6 sc = 15 sc
10 – 17 p. (8 rows) 15 sc
18 p. (3 sc, dec) x 3 times = 12 sc
19 p. dec x 6 time
Pull the loops, cut the thread on one leg and hide it inside the part, on the other, leave the long end of the thread for sewing on the part.
Assembly.
Sew the head to the body.
Sew on the nose and ears at the desired distance.
Sew on the eyes.
Embroider the face, eyebrows.
Attach the paws using a button fastening (similar to a thread fastening, only we bring the needle and thread to the outside of the part and thread it through the button).
We decorate the bear at will with a bow, ribbon, scarf, etc.