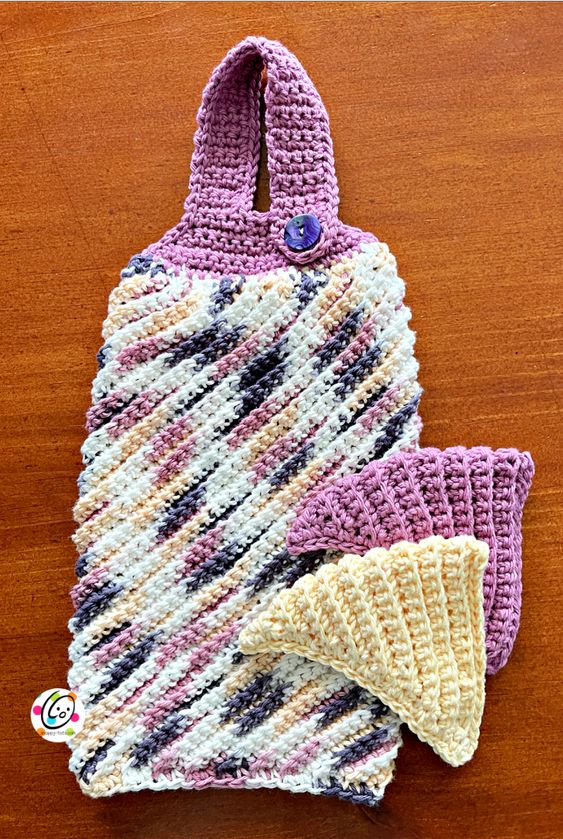
Diagonal Hanging Towel Kitchen Set
Introducing the Diagonal Hanging Towel Kitchen Set, a revolutionary addition to your kitchen that combines functionality with style. This innovative set features a unique diagonal design that not only adds a touch of elegance to your kitchen decor but also provides practicality in every aspect. The Diagonal Hanging Towel Kitchen Set is designed to make your kitchen tasks more convenient and efficient. With its diagonal hanging feature, you can easily access the towels without any hassle. No more searching for a towel or struggling to reach the one at the back of the rack. The towels are neatly arranged in a diagonal pattern, allowing you to grab them effortlessly whenever you need them. The towels are soft, absorbent, and perfect for all your kitchen needs, whether it's drying dishes, wiping spills, or cleaning countertops. The diagonal hanging design not only saves space but also adds a modern touch to your kitchen decor. Say goodbye to cluttered countertops and hello to a sleek and organized kitchen with the Diagonal Hanging Towel Kitchen Set.
Materials:
Yarn
Crochet Hook
Directions – Hanging Towel
This starts at one corner and is worked diagonally across, creating a rectangle shape.
1. With an I hook and cotton yarn, ch 3, sc in 2nd ch from hook, 2sc in next st. (3sts)
2. Ch 1, turn. In BLO, 2sc in same st, sc, 2sc in last st. (5sts)
3. Continue working in BLO for each row to end of cloth part of the pattern. Ch 1, turn, 2sc in same st, sc until 1 st remains, 2sc in last st. (7sts)
4. Repeat previous row until there are 63sts.
5. At this point, we will decrease one end of each row and increase the opposite end. Ch 1, turn. Place a marker in the right edge of the piece. Sc2tog, sc in each st across until 1 st remains, 2sc in the last st. (63sts)
Tip: Each time you are at the edge with the marker it will help remind you to work a decrease. I found this helpful.
6. Ch 1, turn, 2sc in the same st, sc in each st across until 2 sts remain, sc2tog. (63sts)
7. Repeat steps 5-6 until the edge (from the corner) is 14” long.
8. Ch 1, turn, sc2tog, sc in each st until 2 sts remain, sc2tog. (61sts)
9. Repeat the previous row until 3 sts remain.
10. Ch 1, turn, sc2tog, sc.
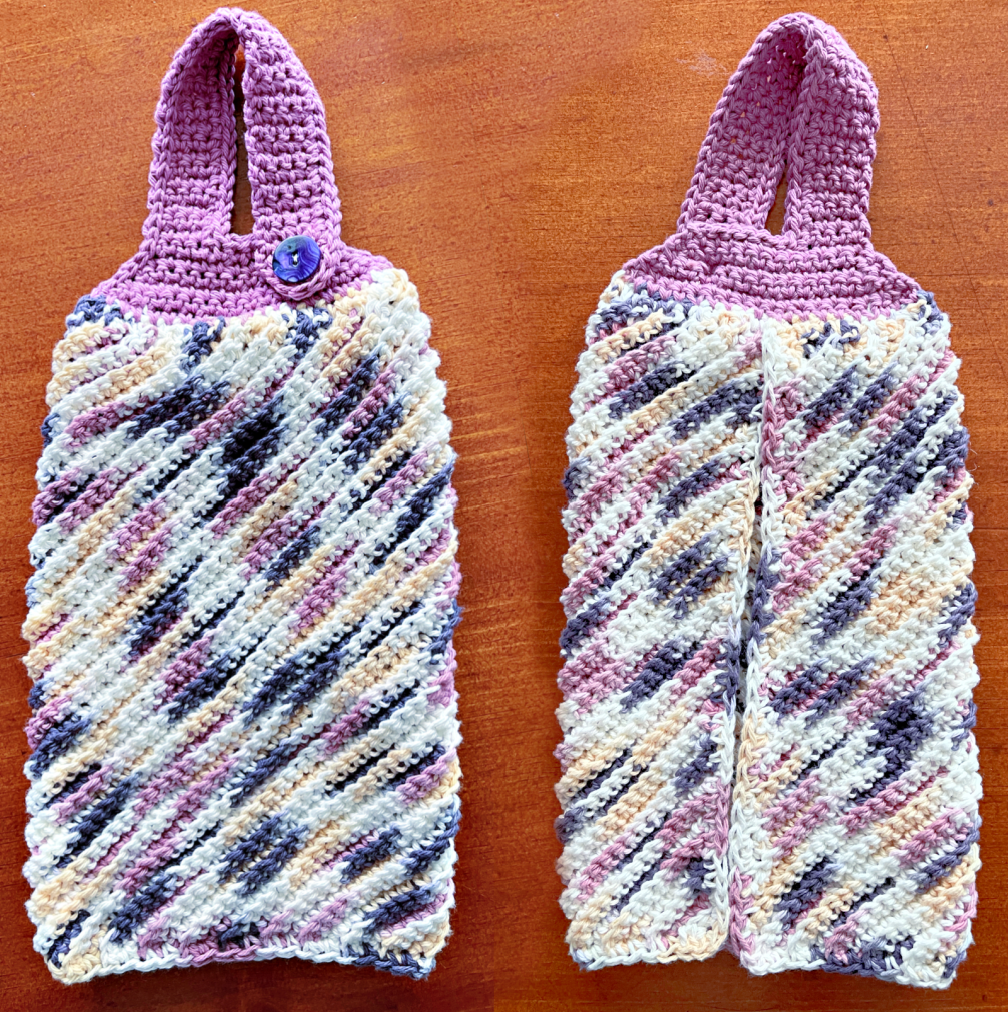
11. This step is worked around the outer edge of the rectangle to create a border. Ch 1, do not turn, pivot piece to work along the side to the left. *Sc 38 sts evenly across the edge (1 at the end of each row), 3sc in the corner, pivot piece to work along the side to the left, sc 30 sts evenly across the edge, 3sc in the corner*, repeat once, sl st to join. Finish off and weave in ends.
12. Place the rectangle on a flat surface with one of the longest sides across the top and wrong side up (border from step #11 is the right side). Fold each edge in, overlapping the top, longer edge. Make sure the ends overlap 2 sts in the middle. Pin the top layers together. Flip the piece over.
13. With an I hook, attach contrasting yarn to the top, right edge. Working through sts from both layers, front and back layers, ch 1, sc in each st to end of row. (20sts)
14. Ch 1, turn, sc2tog, sc in each st until 2 sts remain, sc2tog. (18sts)
15. Repeat the previous row until 12 sts remain.
16. This step starts the handle and is worked across only 4 sts. Ch 1, turn, sc in the same st, sc 3.
17. Repeat the previous step for a total of 34 rows (approximately 9.5” long when complete) or longer if desired. The handle creates a 4” loop when buttoned. You may want a longer handle if you will be hanging it from a wide item. Make sure to end on the wrong side/back of piece.
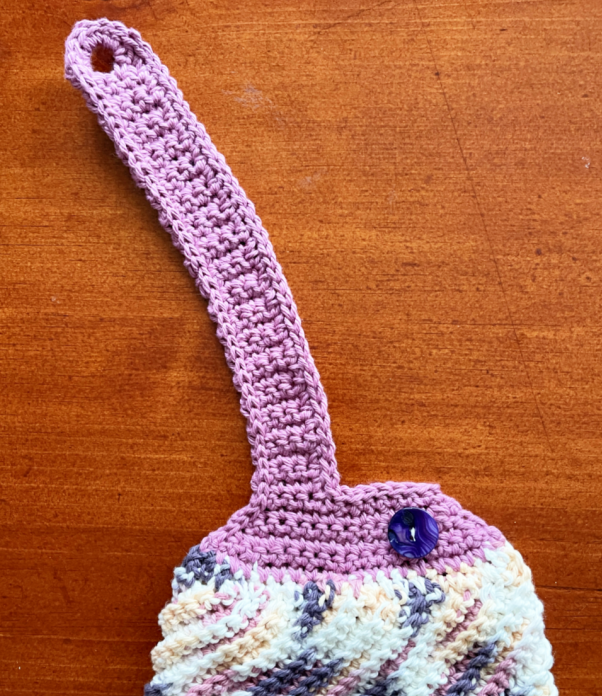
18. Ch 1, turn, at this point you should have the right side towards you. If not, work one more row. This step creates the button hole. Sc 2, ch 5, sc 2. Note: If you have a smaller button you would like to use, ch 3 or 4 instead of 5.
17. Ch 1, turn. Sc in same st, sk 1, sc 6 around ch, sc in last st. Note: if you created a smaller buttonhole, sc the same amount of chs from the previous step.
18. Do not turn. This step is worked down the inner side of the handle. Sc in same st. Sc evenly down side of handle and in each st across top of cloth.
19. Turn. Do NOT ch 1. Sl st in the next st and in each st across top of cloth, up side of handle and loosely across rounded tip of handle. Sl st evenly down outer edge of handle to where the main cloth begins. Finish off and weave in ends.
Button: The button is sewn in the upper right corner of the front side of the cloth. With a sewing needle and thread, securely sew the button in place.
Directions – Triangle Scrubby
This starts at one corner and is worked diagonally across., ending with a triangle.
1. With an I hook and cotton yarn, ch 3, sc in 2nd ch from hook, 2sc in next st. (3sts)
2. Ch 1, turn. In BLO, 2sc in same st, sc, 2sc in last st. (5sts)
3. Continue working in BLO for each row to end of cloth part of the pattern. Ch 1, turn, 2sc in same st, sc until 1 st remains, 2sc in last st. (7sts)
4. Repeat previous row until there are 37sts.
5. This step is worked across the edges, but not the long edge. Ch 1, sc evenly down the side of the piece (1 st per row), 3sc in the tip, sc evenly up the side of the piece. Tip: Try to work the same amount of sc sts on each edge.
6. Fold the top row in half, matching the sts. Ch 1, working through both layers, loosely sl st in each st to end of row. Finish off and weave in ends.
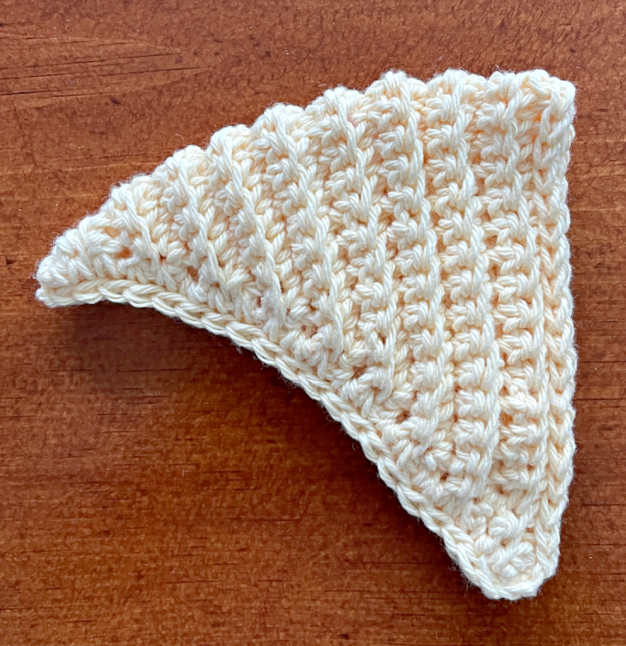
7. Make sure the right side is facing you. With an I hook, attach matching yarn to one tip. Working through both layers, loosely sl st in each st to end of row. Finish off and weave in ends.