Picture Frame Pin Cushion
Transform your ordinary picture frame into a unique and functional pin cushion with this creative DIY project! Say goodbye to searching for your pins and needles in a cluttered sewing box - now you can have them conveniently at your fingertips. This picture frame pin cushion not only adds a touch of charm to your sewing space, but it also keeps your pins organized and easily accessible. Now, your picture frame pin cushion is ready to be used! Simply insert your pins and needles into the cushion, and they will stay in place until you need them. This clever and stylish DIY project is not only practical but also adds a touch of creativity to your sewing space. So why settle for a plain pin cushion when you can have a picture frame pin cushion that is both functional and visually appealing?
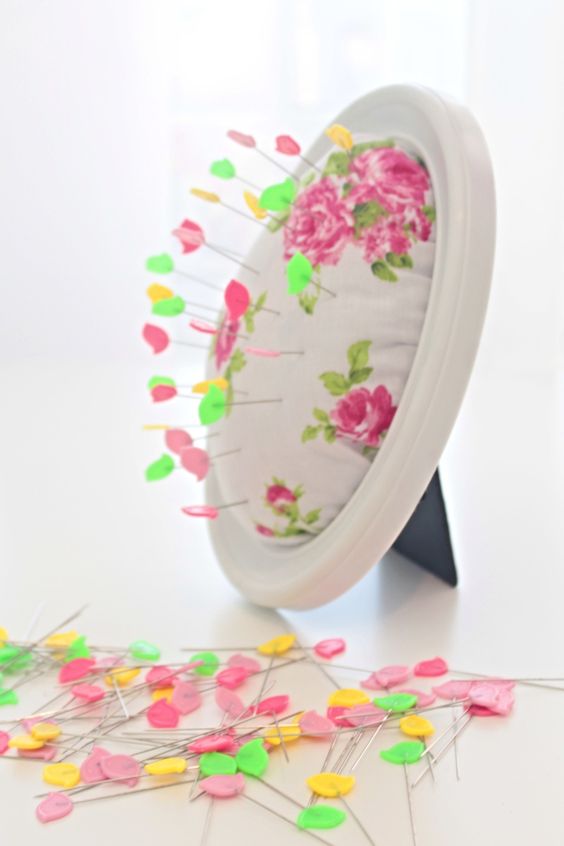
Materials:
- photo frame
- poly-fill
- fabric scraps
- scissors or pinking shears
Directions:
- Remove the backing and the glass of your photo frame and set all pieces aside. My frame had a really fragile glass which I broke when I was trying to put it back and cut my finger in the process. So handle with care or just remove completely from your project if the backing is strong enough to hold the stuffing in place.
- Place the frame wrong side up.
- If your poly-fill is very fluffy and airy, take about two handfuls of poly-fill and squeeze in your hands until you get a compact, smaller ball.
- Get a piece of fabric scrap that is a few inches larger than the frame and place it over the frame.
- Pick the frame with one hand and gently push the fabric down through the hole of the frame. Push as much as the fabric size allows, taking in consideration how big you want your pin cushion.
- Fill the hollow with poly-fill.
- Place the photo frame backing over the poly-fill and secure with the little feet located on the frame (if your frame comes with one, if not use strong adhesive tape)
- Trim the fabric using your scissors or pinking shears.
- Even out the fabric around the right side of the frame.
- And you’re done! Your DIY pin cushion is ready for your new pins!