Crochet Granny Square Shoulder Bag
Create a stylish shoulder bag using the traditional crochet technique known as the Granny Square. This versatile design allows you to mix and match colors and patterns to customize your bag to suit your personal style. The Granny Square pattern consists of clusters of double crochet stitches worked in the round, creating a textured and visually appealing look. By using a variety of yarn colors, you can achieve a unique and eye-catching design that is sure to turn heads. The shoulder strap can be adjusted to your desired length for comfortable wear, and the size of the bag can easily be customized by adding more Granny Squares. Whether you're a seasoned crocheter or a beginner looking for a fun project, the Granny Square shoulder bag is a great way to showcase your creativity and craft a one-of-a-kind accessory.
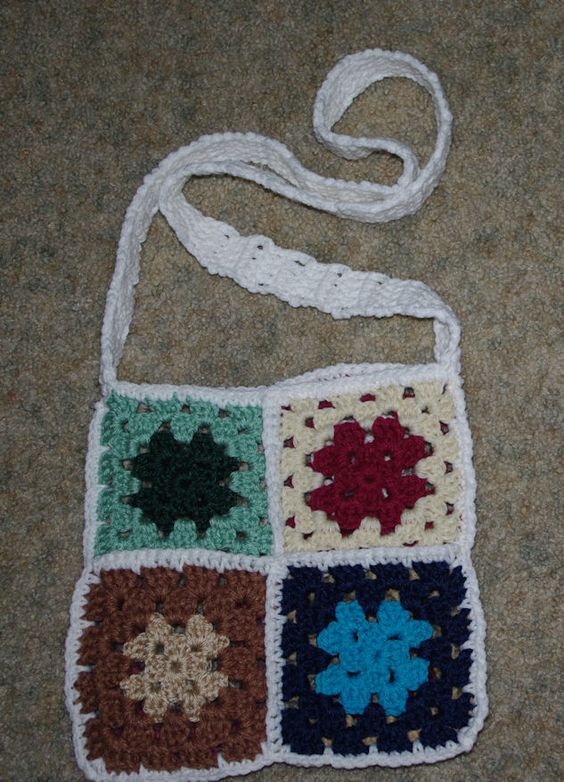
Measures 10" x 10"
excluding handle
MATERIALS:
Red Heart Super Saver, 4ply worsted weight (Less than 5 ounces of assorted colors)Hook Size G
Yarn needle
Stitches: ch, dc, sc, sl st.
Difficulty: DIFFICULT
GRANNY SQUARES (MAKE 8)
RND 1: With the color of your choice, Ch4,
(work all of the following sts in the 4th ch from the hk)
2 dc, * ch 1, 3 dc, repeat from * twice more, ch 1.
Join with sl st in top of beg ch 4.
Ch 3, turn the piece over. (Right Side)
RND 2: (2 dc, ch 2, 3 dc) in next ch 1 sp. Ch1
* (3 dc, ch 2, 3 dc) in next ch 1 sp. Ch1.
Repeat from * twice more. Ch1.
Join with sl st in top of beg ch 3. (Wrong side)
Fasten off.
RND 3: Join new color (color of your choice), with a sl st in the ch sp on either side of the square. Ch3. 2 dc in same space. Ch1. (3 dc ch 2, 3 dc) in the next ch sp on the corner of the square. * Ch1. 3 dc in next ch sp. Ch1. (3 dc, ch 2, 3 dc) in next corner ch sp. Repeat from * twice. Ch1.
Join with sl st in top of beg ch 3.
RND 4: Ch 3, turn the square over.
2dc in same space. Ch1. 3dc in next ch sp.
Ch1. (3dc, ch2, 3dc) in corner ch sp.
* (Ch1. 3dc in next ch sp.) twice. Ch1.
(3dc, ch2, 3dc) in corner ch sp.
Repeat from * twice. Ch1.
Join with a sl st in the top of the beg ch3.
Fasten Off and weave in yarn ends using the yarn needle.
ASSEMBLY
Hold 2 squares with wrong sides tog. Sc through the outer loops of all corresponding stitches except the ch sps. When you come to a ch sp, work into the actual ch sp... not through the outer loops of both chains.
Do not fasten off.
Continue joining the next two squares in the same manner until all four sets of squares are joined lengthwise.
Fasten off.
Repeat this joining method widthwise for each section. As you come to the point where the two joins intersect, work over the intersection and continue as before.
Fold the piece so there are 4 squares on the front and 4 squares on the back.
The fold becomes the bottom of the bag.
Join same yarn used in joining squares with a sc in the corresponding corner ch sps on the end opposite the fold. Join cor sts down that side.
Fasten off.
Rep for other side.
Join same yarn with a sc in any st along the open end/top of bag.
Sc in ea st and ch sp around eitire opening. Join with a sl st.
Fasten off.
HANDLE
Leave a 10" length of yarn on each end of handle to use when sewing the
handle onto the bag.
R1: Ch6, sc in the hump of the 2nd ch from the hook. Sc in the hump of ea rem ch. (5sc)
R2-72: Ch3, turn. Sc in ea st. (5sc)
R73: Ch1, turn. Sc in ea st.
Fasten off.
JOIN HANDLE TO BAG
Center the handle evenly on one side of the bag. Using the yarn needle and the yarn tail, sew through cor sts to join.
Repeat for opposite side being careful not to twist the handle.
Weave in ends.