Crochet Granny Basket Potholder
Discover the charm of the Crochet Granny Basket Potholder, a delightful and practical addition to your kitchen or dining area. This unique crochet project combines the timeless beauty of the granny square pattern with the functionality of a basket-shaped potholder. Handcrafted with love and attention to detail, this potholder not only protects your hands from hot pots and pans but also adds a touch of vintage elegance to your home. Crafted using soft and durable yarn, the Crochet Granny Basket Potholder is not only a practical kitchen accessory but also a beautiful decorative piece. Hang it on a hook or display it on your countertop to add a touch of handmade charm to your space. Whether you're a crochet enthusiast or simply looking for a unique gift idea, this potholder is sure to impress with its timeless appeal and functional design. So grab your crochet hook, select your yarn, and get ready to create a one-of-a-kind Crochet Granny Basket Potholder that will be cherished for years to come.
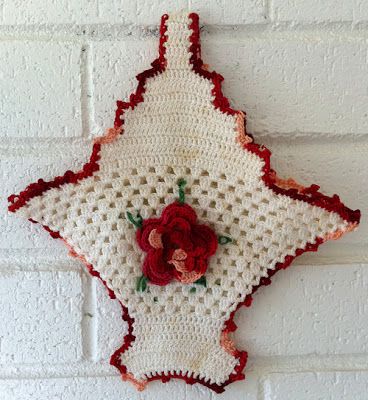
Intermediate Skill
Size: About 8 inches across, 9 inches long
Materials: Number 10 Crochet Thread: White & Variegated Reds, Small amount Green.
Thread needle.
Crochet Hook:Steel size 7 (1.65 mm) or size needed to obtain gauge.
Gauge: 10 sts = 1 inch, 4 rows dc = 1 inch
Special Stitches
Shell: 3 dc in same st or sp.Picot: Ch 3, sl st in 3rd ch from hook.
Lazy Daisy Stitch:
1. Bring needle from back to front. Form a loop with the thread and hold it with your thumb. Insert the needle from the front to the back, then bring it to the front so the thread is under the needle.
2. Insert needle from front to back at to make a small anchor stitch to hold the loop in place.
BASKET (Make 2)
Rnd 1: (Right Side) Starting at bottom, with White, ch 19, dc in 5th ch from hook (skipped ch counts as first tr and ch 1), (ch 1, dc) in next 13 ch, ch 1,
(dc, ch1, tr, ch 1, dc) in last ch; working in opposite side of starting ch, (ch 1, dc) in next 14 ch across,
ch 1; join with sl st to first tr. (30 dc, 2 tr )
Rnd 2: Ch 3 (counts as first dc), turn, (dc in next dc, dc in ch-1 sp) 14 times, dc in next dc, dc in next tr, (dc in next dc, dc in ch-1 sp) 14 times, dc in next dc; join. (60 dc)
Rnds 3-4: Ch 3, turn, (dc in next dc) around; join. (60 dc)
Rnd 5: Ch 1, turn, sl st in next 5 dc, ch 3, dc in next 19 dc, skip next 10 dc, dc in next 20 dc; join. (40 dc)
Rnd 6: Ch 3, (dc in next dc) around to last dc, skip last dc; join. (39 dc)
Rnd 7: Ch 3, (dc in next dc) around; join. (39 dc)
Rnd 8: Ch 3, dc in same st as joining, (ch 1, skip next 2 dc, Shell in next dc) around to end, ch 1, dc in same st as joining; join. (13 Shells)
Rnd 9: Ch 3, dc in same st as joining, (ch 1, Shell in next ch-1 sp) 6 times, ch 1, Shell center dc of next Shell (side-shell), (ch 1, Shell in next ch-1 sp) 7 times, ch 1, dc in same st as joining; join. (15 Shells)
Rnds 10-21: Ch 3, dc in same st as joining, (ch 1, Shell in next ch-1 sp) around, working (ch 1, Shell in center dc of side-shell, and ending, ch 1, dc in same st as joining; join.
(17, 19, 21, 23, 25, 27, 29, 31, 33, 35, 37, 39 Shells)
At the end of Rnd 21, finish off and weave in ends.
Note: Front of Basket has one more Shell than back.
Front Side
Row 1: With right side of Front facing, skip 5
ch-1 sps and join White with sl st to next sp, ch 3,
(dc in next 3 dc, dc in next ch-1 sp) 9 times. (37 dc) Leave remaining sts unworked.
Rows 2-3: Ch 3, turn, (dc in next dc) across.
Row 4: Ch 1, turn, sl st in next 5 sts, ch 3, dc in next 26 sts. (27 dc) Leave remaining 5 dc unworked.
Rows 5-6: Ch 3, turn, (dc in next dc) across.
Row 7: Ch 1, turn, sl st in next 5 sts, ch 3, dc in next 16 sts. (17 dc) Leave remaining 5 dc unworked.
Rows 8-9: Ch 3, turn, (dc in next dc) across.
Row 10: Ch 1, turn, sl st in next 5 sts, ch 3, dc in next 6 sts. (7 dc) Leave remaining 5 dc unworked.
Row 11-14: Ch 3, turn, (dc in next dc) across.
At the end of Row 14, finish off and weave in ends.
Back Side
Row 1: With right side of Back facing, skip 4
ch-1 sps and join White with sl st to next sp, ch 3,
(dc in next 3 dc, dc in next ch-1 sp) 9 times. (37 dc) Leave remaining sts unworked.
Rows 2-14: Rep Rows 2-14 of Front Side.
– Sew Row 14 of Front and Row 14 of Back together to form Handle.
Handle Edging
Rnd 1: With right side of Front facing, join Red with sl st to center dc of side shell, ch 1, sc in center dc of Shell, picot, sc in next dc, sc in next ch-1 sp, (sc in next 3 dc, sc in next ch-1sp, picot) across, working in sides of rows, (2 sc in next 3 rows, picot, working in unused sts of Row, sc in next 5 dc, picot) 3 times, 2 sc in next 5 rows, sc in join, sc in next 5 rows, picot, (working in unused sts of Row, sc in next 5 dc, picot, 2 sc in next 3 rows, picot) 3 times, working in Rnd 21, (sc in next 3 dc, sc in next ch-1 sp, picot) across to last Shell, sc in next 3 dc, sc in next
ch-1 sp; join with sl st to first sc. DO NOT FINISH OFF.
Basket Edging
Row 1: Working down side rows of basket, over post of center dc of side shells, ch 1, (sc over post of next 2 rows, picot) twice, (sc over post of next 3 rows, picot) 3 times, (sc over post of next 2 rows, picot) twice, working in unused sts of Rnd 5 through both thicknesses, sc in next 5 dc, picot, working down side rows over posts, (sc over post of next 2 rows, picot) twice, working along foundation ch between sts, (sc in next 5 sts, picot) 3 times, working up side rows over turning ch-3, (sc over post of next 2 rows, picot) twice, working in unused sts of Rnd 5 through both thicknesses, sc in next 5 dc, picot, working in sides of rows over turning ch-3, (sc over post of next 2 rows, picot) twice, (sc over post of next 3 rows, picot) 3 times, (sc over post of next 2 rows, picot) twice, sl st in top of turning ch. DO NOT FINISH OFF.
Second Handle Edging
Rnd 1: With right side facing, working in Rnd 21, ch 1, sc in center dc of Shell, picot, sc in next dc,
sc in next ch-1 sp, (sc in next 3 dc, sc in next ch-1sp, picot) across, working in sides of rows, (2 sc in next 3 rows, picot, working in unused sts of Row, sc in next 5 dc, picot) 3 times, 2 sc in next 5 rows, sc in join, sc in next 5 rows, picot, (working in unused sts of Row, sc in next 5 dc, picot, 2 sc in next 3 rows, picot) 3 times, working in Rnd 21, (sc in next 3 dc, sc in next ch-1 sp, picot) across to last Shell, sc in next 3 dc, sc in next ch-1 sp; join with sl st to first sc. Finish off and weave in ends.
FLOWER
Rnd 1: (Right Side) Starting at center, with R, ch 8, join with sl st to first ch to form ring; ch 3, 19 dc in ring; join with sl st to first dc. (20 dc)
Rnd 2: (Ch 6, skip 3 dc, sl st in next dc) 5 times.
Rnd 3: * (Sc, hdc, 4 dc, hdc, sc) in next ch-6 lp, sl st in next sl st; rep from * around. (5 petals)
Rnd 4: Working behind petals, (ch 8, sl st between petals) around.
Rnd 5: * (Sc, hdc, 6 dc, hdc, sc) in next ch-6 lp, sl st in next sc; rep from * around. (5 petals)