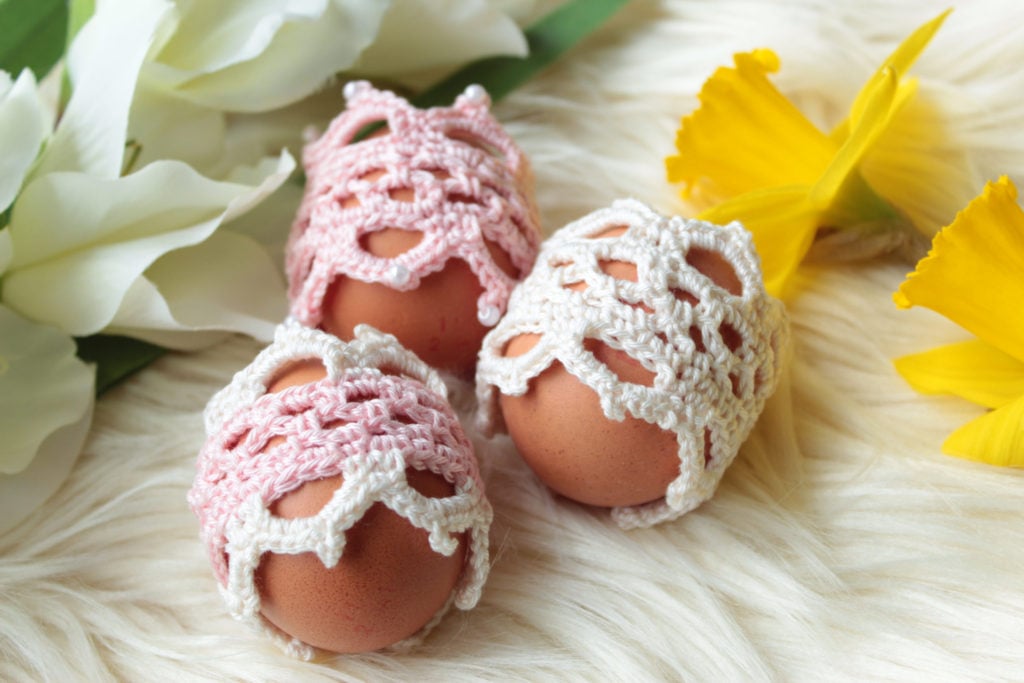
Crochet Stunning Vintage Easter Egg Hug
Dive into the world of crochet and embark on a journey to craft a charming Easter egg hug with a vintage twist. This unique project allows you to showcase your crochet skills while infusing a touch of old-world charm into your Easter celebrations. The intricate patterns and delicate stitches will bring a sense of elegance to your Easter table, making it a truly unforgettable experience for your loved ones. So grab your crochet hook, choose your favorite yarn colors, and let your imagination run wild as you create a stunning vintage Easter egg hug that will be the envy of all.
MATERIALS
- King Cole Giza (4-ply; 100% cotton; 158m per 50g ball) x 1 ball in Cream and Petal
- 3 mm crochet hook
- Yarn needle
- Scissors
- Optional 12 x 4 mm pearl beads
FINISHED SIZE
13 cm circumference x 4.5 cm height
TENSION
13 sts x 12 rounds = 5 cm measured over sc
STITCHES AND ABBREVIATIONS (US CROCHET TERMS)
ch- chain stitch
sc- single crochet
sl st- slip stitch
ch-sp – chain space
picot shell- (4 sc, picot, 4 sc) worked into same space
picot- 3 ch, sl st into 3rd chain from hook to close the loop
beaded picot– 1 ch, place bead close to stitch, 1 ch behind the bead, 1 ch, sl st into 3rd chain from hook to close the loop
For abbreviations master list as set out by Craft Yarn Council.
CROCHET EASTER EGG HUG PATTERN NOTES
- The pattern starts with foundation chain which is connected into a circle and worked in round
- Middle section is completed first with pattern continuing with the picot shells on one side
- You join yarn on the underside of the foundation chain to complete the picot shells on the other side
- These egg hugs are versatile and can be used as vintage napkin rings after the holidays.
CROCHET EASTER EGG HUG MAIN PATTERN
Note : If you are working on the two colour version or the beaded egg hug, please read instructions below first.
Chain 36, sl st to first first stitch being careful not to twist the foundation chain.
Rnd 1: 1 ch (doesn’t count as a stitch here and throughout), 1 sc in same st, * 3 ch, miss next 2 sts **, 1 sc in next st; repeat pattern from * ending last repeat at **, sl st to first sc.
Rnd 2: 1 ch, sl st into next 3 ch-sp, 1 ch, 1 sc into same 3 ch-sp, * 3 ch **, 1 sc into next 3 ch-sp; repeat pattern from * ending last repeat at **, sl st to first sc.
Rnd 3: 1 ch, sl st into next 3 ch-sp, 1 ch, 1 sc into same 3 ch-sp, * 2 ch **, 1 sc into next 3 ch-sp; repeat pattern from * ending last repeat at **, sl st to first sc.
Rnd 4: 1 ch, 1 sc in same st, * 2 sc into next 2 ch-sp **, 1 sc into next sc; repeat pattern from * ending last repeat at **, sl st to first sc.
Rnd 5: 1 ch, starting in same st, * 1 sc in each of the next 3 sts, 5 ch, miss 3 sts; repeat pattern from *, sl st to first sc.
CROCHET EASTER EGG HUG PATTERN CONTINUES
Rnd 6: sl st to next sc (the middle sc of the three), 1 ch, 1 sc in same st, * miss next sc, picot shell into next 5 ch-sp, miss next sc **, 1 sc into next sc; repeat pattern from * ending last repeat at **, sl st to first sc.
Fasten off. Join yarn into underside of the foundation chain into any ch with sc st worked into.
Rnd 7: 1 ch, 1 sc in same st, * 2 sc into next 2 ch-sp of foundation chain **, 1 sc into next st; repeat pattern from * ending last repeat at **, sl st to first sc.
Rnd 8: 1 ch, * 1 sc in each of the next 3 sts, 5 ch, miss 3 sts; repeat pattern from *, sl st to first sc.
Rnd 9: sl st to next sc (the middle sc of the three), 1 ch, 1 sc in same st, * miss next sc, picot shell into next 5 ch-sp, miss next sc **, 1 sc into next sc; repeat pattern from * ending last repeat at **, sl st to first sc.
Fasten off.
TWO COLOUR VERSION
Follow the above pattern working Rnd 1 – Rnd 4 and Rnd 7 in Petal and the rest of the rounds in Cream.
EGG HUG WITH BEADS
Thread 12 pearl beads onto your yarn before starting the pattern. The bead is fixed into the picot at the top of the picot shell.
To work the picot shell with added bead replace the standard picot with beaded picot (see stitch abbreviations).
FINISHING INSTRUCTIONS
Sew in all ends.