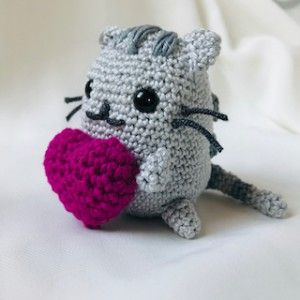
Crochet Little Cat with Heart Love
If you're looking for a fun and creative project, why not try crocheting a little cat with a heart? This delightful craft allows you to bring a cute and lovable feline friend to life, complete with a heart-shaped detail that adds an extra touch of love. Crocheting is a wonderful way to relax and express your creativity, and this project is perfect for both beginners and experienced crocheters. Unleash your inner creativity and embark on a delightful crochet adventure as you bring a charming little cat to life, complete with a heart-shaped touch. This enchanting project is perfect for those who love both crocheting and cats, as it combines the joy of crafting with the adorableness of our feline friends.
MATERIALS
Amigurumi Cotton Yarn, the color you like for:
Body, Legs, Hands, Ears (color A)
Stripes, Hair (color B)
Whiskers and Nose (color C)
I used: YarnArt Begonia: 100% cotton, mercerized cotton, 50g = 169m
Colors: light grey yarn for body and legs and hands and ears, dark grey for stripes and hairs and black for whiskers and nose.
2 mm crochet hook
8 mm plastic safety eyes - 2 pieces
Scissors
Stuffings
Sewing/Embroidery and yarn needle/tapestry needle for sewing pieces together and weaving in ends
Markers
Pins
The pattern was made with YarnArt Begonia: 100% cotton, mercerized cotton, 50g = 169m
Crochet hook 2.00 mm.
Difficulty Level: Level 1 – Easy, for beginners
US crochet terms:
SlSt – slip stitch
CH/s – chain/s
SC - single crochet
SK - skip
T - turn
ST/s - stitch(es)
REP – repeat
SC2TOG = 2 single crochets together
Special stitches used:
Single Crochet Decrease (sc2tog)
A crochet decrease makes the current row or round that you are working on shorter than the one previous to it.
1. Insert hook into the first stitch.
2. Yarn over and draw through the loop.
3. Do not complete the stitch as normal.
4. Instead, insert the hook into the next stitch.
5. Yarn over and draw through the loop.
6. There should now be three loops on your hook
7. Yarn over and draw through all three loops on the hook
8. You should now have two single crochet stitches side-by-side, joined together into one stitch at the top.
This pattern requires familiarity with stitches used, attaching yarn, changing yarn colors, sewing parts together with a sewing needle.
PATTERN NOTES
1) A ch1 at beg of the row DOESN'T count as a stitch
2) Magic ring = the starting point for crocheting in a spiral. Use which ever method you prefer.
3) Continuous rounds - BODY, LEGS, HANDS, EARS parts are worked up in continuous rounds, which means that you will not be joining the last stitch of the round with the first one. Instead you will need to keep track of where each round started and how many stitches you have made because after each round you will continue right on to the stitches of the next round (with no join). It is useful to use a stitch marker or piece of yarn to mark the start or end of each round.
4) ( ) – The number of stitches that should be in a completed round/row are placed in brackets at the end of that round’s/row’s instructions.
5) This Cute Little Cat Amigurumi measures: 10 cm / 4 inch
6) You can make the Cat Amigurumi bigger with a thicker yarn or a larger hook size.
7) There is just minimal sewing, you will only sew the hands, the legs, the ears and the stripes to the body - this is quick and easy to do, there are no tricks.
THE WRITTEN PATTERN
THE BODY
Colour A
Ch1 at the beginning of round don't count as a stitch.
This part is worked in spiral rounds, without joining rounds. Do not join rounds.
Make a magic ring
R1 – R9 = increase rounds
R1: ch1, 6sc in magic ring, sl st (6sc)
R2: *2sc in each sc from R1 around* rep from * to * till end of round (12 sc)
R3: *1sc in next st, 2sc in next st * rep from * to * till end of round (18 sc)
R4: *1sc in next 2st, 2sc in next st * rep from * to * till end of round (24 sc)
R5: *1sc in next 3st, 2sc in next st * rep from * to * till end of round (30 sc)
R6: *1sc in next 4st, 2sc in next st * rep from * to * till end of round (36 sc)
R7: *1sc in next 5st, 2sc in next st * rep from * to * till end of round (42 sc)
R8: *1sc in each st around * rep from * to * till end of round (42 sc)
R9: *1sc in next 6st, 2sc in next st * rep from * to * till end of round (48 sc)
R10 – R20 (11 rounds): 1 sc in each st around (48 sc)
R21: *1sc in next 6st, sc2tog* rep from * to * till end of round (42 sc)
R22: 1 sc in each st around (42 sc)
Add safety eyes size 8 mm between row 19 and 20, skip 6 stitches apart.
The eyes are 6 st apart from each other.
Stuff the body well.
R23: *1sc in next 5st, sc2tog* rep from * to * till end of round (36 sc)
R24: 1 sc in each st around (30 sc)
R25: *1sc in next 4st, sc2tog* rep from * to * till end of round (24 sc)
R25: *1sc in next 3st, sc2tog* rep from * to * till end of round (18 sc)
Stuff more if needed before finishing round R26
R26: *1sc in next 2st, sc2tog* rep from * to * till end of round (12 sc)
R27: *sc2tog* rep from * to * till end of round (6 sc)
R28: join all stitches together
To join the body go with a sewing needle in front and back loops of each stitch around and pull as tight as you can.
Cut yarn colour A and fasten off and wave all ends in.
STUFFING
The exact moment for starting filling and stuffing the toy depends on every single person. I prefer filling the toy with the work almost finished. It’s a bit more difficult to fill, but more comfortable to crochet. You should make proofs until finding the more suitable moment of filling for you.
THE LEGS
Colour A
Ch1 at the beginning of round don't count as a stitch.
This part is worked in spiral rounds, without joining rounds. Do not join rounds.
Make a magic ring
R1: ch1, 6sc in magic ring, sl st (6 sc)
R2: *2sc in next st, 1sc in next st* rep from * to * till end of round (9 sc)
R3 – R4: 1sc in each st around (9 sc)
Cut the yarn and leave a longer tail.
Repeat the pattern for the second LEG.
THE HANDS
Colour A
Ch1 at the beginning of round don't count as a stitch.
This part is worked in spiral rounds, without joining rounds. Do not join rounds.
Make a magic ring
R1: ch1, 6sc in magic ring, sl st (6 sc)
R2 – R4: 1sc in each st around (9 sc)
Cut the yarn and leave a longer tail.
Repeat the pattern for the second HAND.
THE EARS
Colour A
Ch1 at the beginning of round don't count as a stitch.
This part is worked in spiral rounds, without joining rounds. Do not join rounds.
Make a magic ring
R1: ch1, 4sc in magic ring, sl st (4 sc)
R2: *2sc in next st, 1sc in next st* rep from * to * till end of round (6 sc)
R3: *2sc in next st, 1sc in next st* rep from * to * till end of round (9 sc)
R4: 1sc in each st around (9 sc)
Cut the yarn and leave a longer tail.
Repeat the pattern for the second EAR.
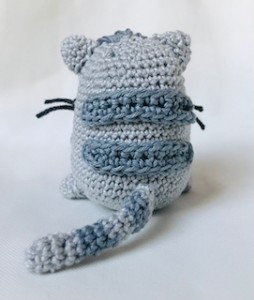
THE STRIPED TAIL
Colour A, Color B – follow the instructions below
Ch1 at the beginning of round don't count as a stitch.
This part is worked in spiral rounds, without joining rounds. Do not join rounds.
Make a magic ring
R1: ch1, 6sc in magic ring, sl st (6 sc)
R2 – R15: 1sc in each st around (6 sc)
R1-R5: color A
R5-R7: color B
R8-R10: color A
R11-R13: color B
R14-R15: color A
Fasten off with a long tail.
WHISKERS
Pull yarn 1 time through the row R38 of the Body, make a knot on the end on the nose on both side. Cut the yarn 1 inch / 1.5 cm
Repeat the pattern for the second WHISKER.
NOSE + MOUTH
Colour C - black
Sew the NOSE + MOUTH on round R to the BODY approximately on the position the middle of the WHISKERS.
HAIR STRIPES
Sew THREE HAIR STRIPES on the top of the head – start on round R3 behind the magic ring and finish on round R5 approximately on the position the middle of the EARS.
FINISHING INSTRUCTIONS
Make sure the body is stuffed well before sewing, but not so firm that you can see the stuffing through the stitches. Work around the entire round.
Start sewing EARS on the top of the BODY/HEAD and make sure the center of the head is aligned. Work around the entire neck.
Sew the EAR on the BODY.
Sew the second EAR 11 stitches apart from the first EAR.
Work around the entire round.
Sew two legs and two hands to the sides of the body.
And voila! You made a CUTE LITTLE CAT IN LOVE!