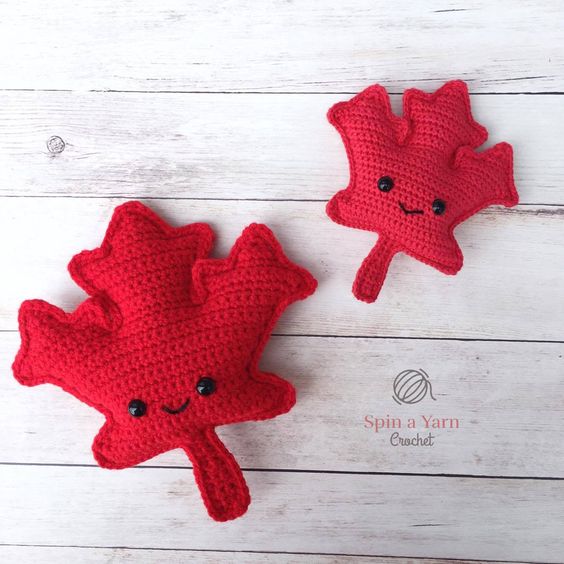
Crochet Maple Leaf Amigurumi
Create your very own adorable maple leaf plush toy using the art of crochet! This fun and creative project involves using yarn and a crochet hook to craft a cute amigurumi version of a maple leaf. The process includes crocheting individual pieces in the shape of a leaf, stuffing them with filling to give them a plush texture, and then sewing them together to form the final product. The end result is a charming and unique decoration that can be displayed in your home or given as a thoughtful handmade gift to a friend or loved one. You can choose from a variety of yarn colors to customize the look of your plush toy, whether you prefer a traditional red maple leaf or a more whimsical rainbow-colored design. This project is perfect for both beginners and experienced crocheters, as it offers a fun and rewarding way to practice different crochet techniques while creating a cute and festive decoration. So grab your crochet hook and yarn, and get ready to bring a touch of autumn charm into your home with a handmade maple leaf amigurumi!
Here’s what I used:
- 3.5mm hook
- Red Heart Super Saver in Red;
- Black embroidery thread for mouth;
- 8mm safety eyes;
- Stuffing;
- Tapestry needle.
Abbreviations and Stitches – The entire piece is worked in single crochet stitches.
*Ch 1 and turn at the end of each row.*
Body (make 2 panels) in Red:
We will start at the bottom of the stem and work up.
Row 1: Ch 4, sc along (3 sts)
Rows 2-5: Sc along (3 sts)
Row 6: Dec, sc (2 sts)
Rows 7-9: Sc along (2 sts)
Row 10: Ch 13, sc along the chains and in the 2 sc of previous row (14 sts)
Row 11: Ch 13, sc along the chains and in the 14 sts of previous row (26 sts)
Row 12: Dec, sc 22, dec (24 sts)
Row 13: Dec, sc 20, dec (22 sts)
Row 14: Dec, sc 18, dec (20 sts)
Row 15: Dec, sc 16, dec (18 sts)
Row 16: Inc, sc 16, inc (20 sts)
Row 17: Sc along (20 sts)
Row 18: Inc, sc 18, inc (22 sts)
Row 19: Sc along (22 sts)
Row 20: Inc, sc 20, inc (24 sts)
Row 21: Sc along (24 sts)
Row 22: Inc, sc 22, inc (26 sts)
Row 23: Sc along (26 sts)
Row 24: Inc, sc 24, inc (28 sts)
Row 25: Sc along (28 sts)
Row 26: Inc, sc 26, inc (30 sts)
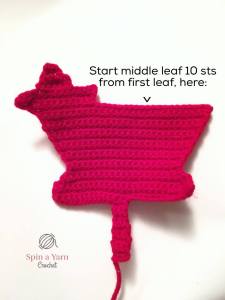
Now we will start the first “leaf”, which will be the one farthest to the left as you look at it.
Row 27: Inc, sc 9 (11 sts)
Row 28: Sc 10, inc (12 sts)
Row 29: Inc, sc 10, inc (14 sts)
Tie off.
Now we will complete the middle peak of the first leaf. You will count in 4 sts and crochet in the middle 6 stitches of row 29.
Row 1: Sc 6 in middle (6 sts)
Row 2: Dec, sc 2, dec (4 sts)
Row 3: Dec twice (2 sts)
Row 4: Dec (1 st)
Tie off.
Now we will start the second/middle leaf. You will crochet in the 10 middle stitches of Row 26 (i.e the 10 stitches immediately next to the first leaf).
Row 1: Sc 10 (10 sts)
Row 2: Sc along (10 sts)
Row 3: Inc, sc 8, inc (12 sts)
Rows 4-5: Sc along (12 sts)
Row 6: Inc, sc 10, inc (14 sts)
Rows 7-8: Sc along (14 sts)
Row 9: Inc, sc 12, inc (16 sts)
Tie off.
Now we will complete the middle peak of the second leaf. You will count in 4 stitches and crochet in the middle 8 sts of the previous row.
Row 1: Sc 8 (8 sts)
Row 2: Dec, sc 4, dec (6 sts)
Row 3: Dec, sc 2, dec (4 sts)
Row 4: Dec twice (2 sts)
Row 5: Dec (1 st)
Tie off.
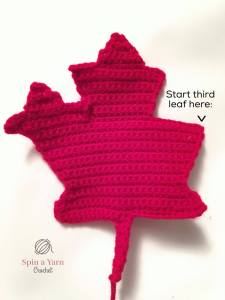
Now we will start the third leaf. Insert your hook into the last stitch of Row 26 (i.e. on the outside, furthest away from the middle leaf).
Row 1: Inc, sc 9 (11 sts)
Row 2: Sc 10, inc (12 sts)
Row 3: Inc, sc 10, inc (14 sts)
Tie off.
Finally, we will complete the middle peak of the third leaf. You will count in 4 sts and crochet in the middle 6 stitches of the previous row.
Row 1: Sc 6 in middle (6 sts)
Row 2: Dec, sc 2, dec (4 sts)
Row 3: Dec twice (2 sts)
Row 4: Dec.
Tie off. Repeat all of the above for the second panel. Do not tie off second panel. Pull up a long loop and put these aside for assembly.
Assembly:
Step 1: Face
If you want to include a face on your Maple Leaf, insert 8mm safety eyes onto your front panel now. Then stitch on the mouth with black embroidery thread or yarn.
Step 2: Maple Leaf
Place the two body panels of your Maple Leaf together and match up all sides.
**Make sure the front of your Maple Leaf is facing you as you crochet around the outside of the piece.**
Your yarn should still be attached from the last stitch you completed. Starting there, begin attaching the panels together by chaining one and single crocheting around the outside of the panels.
Take note of the following items as you crochet around:
- Sc 3 into the same st at the tip of each peak (11 peaks total, including bottom two).
- Sc 2 in the same st at the corners between peaks.
- (Sc, ch, sc) into the corners of Row 1 at the bottom of the stem.
Stuff as you go. Use the back of a crochet hook to push the stuffing into each peak. Slst to your first st and close off. Use the back of your tapestry needle to poke any yarn tails back inside the piece.