Crochet Heart Pillow
Create a charming heart-shaped pillow using the art of crochet. This delightful project involves using a crochet hook and yarn to craft a cozy and decorative pillow that will add a touch of handmade warmth to any room. By following a simple pattern and using basic crochet stitches, you can easily create a lovely heart pillow that can be customized with different colors and textures to suit your personal style. Whether you are a seasoned crocheter or a beginner looking for a fun and rewarding project, making a crochet heart pillow is a great way to express your creativity and add a handmade touch to your home decor. With just a few skeins of yarn and a little bit of time and patience, you can create a beautiful and unique pillow that will be cherished for years to come.
Materials:
- YARN:
- #5 Bulky Weight – 190 yards of Red Heart Hygge in 2 colors for 1 pillow; (A) – Main Background Color; (B) – Contrast Color Hearts
- TOOLS:
- US Size (K/10.5) 6.5mm crochet hook or size needed to obtain gauge
- Yarn needle, Scissors, 12 x 16″ pillow form
Difficulty:
- Intermediate
Stitches/Abbreviations: US Terms
- ch – chain
- st(s) – stitch(es)
- sl st – slip stitch
- sc – single crochet
Size:
- One Size – 12 x 16″
Notes:
- This pillow is crocheted using the tapestry crochet technique
- You can carry the unused yarn color under the active yarn stitches or you can use floats and catch the yarn under 1 stitch every few stitches.
- You do not need to carry the Color of the Heart all the way to the end of the row. Just drop it after the last stitch of the heart in that row and pick it back up in the next row when you start the heart again.
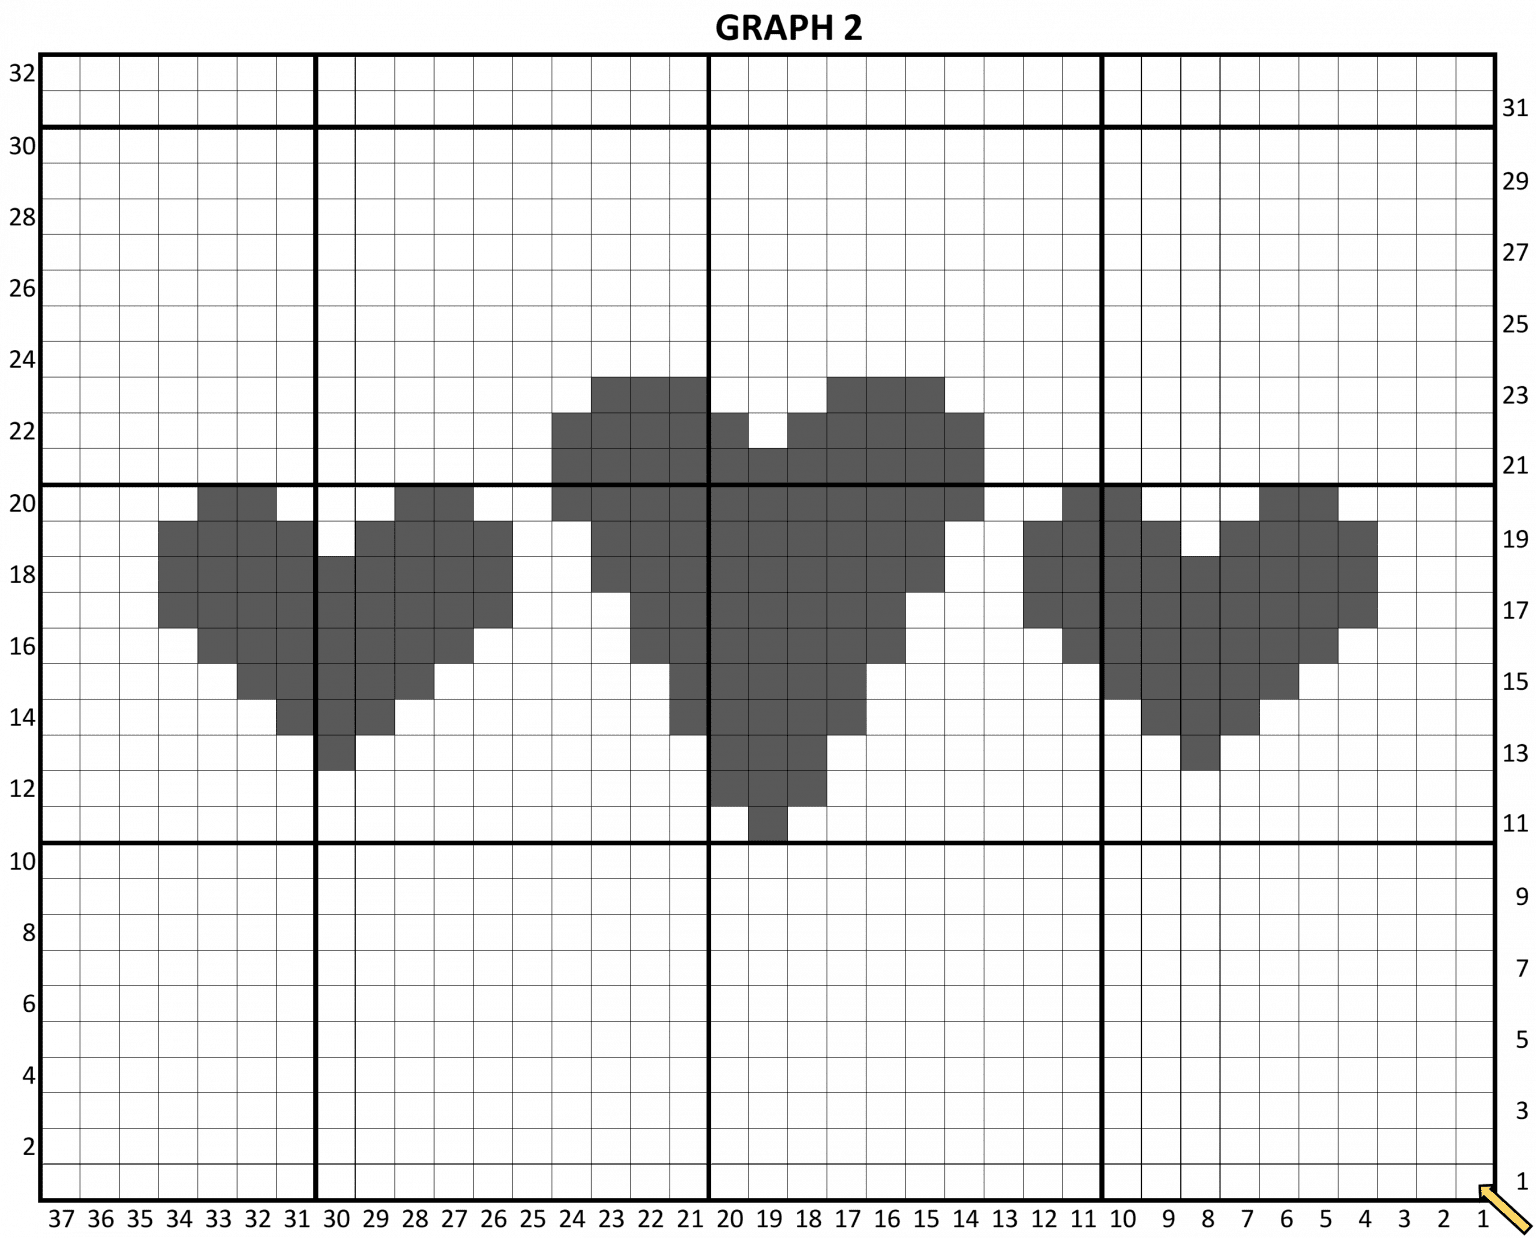
- If you are following along with the graph at the end of the written instructions, start where the arrow indicates, and each square represents 1 sc st.
- When you are changing color, make sure the color changes happen on the same side of the panel each time, this will become the Wrong Side which will be the inside of the pillow.
Instructions Crochet Hold My Heart Pillow Pattern
Instructions – Graph 1
*Every stitch is a single crochet stitch. The number of stitches for each color is in parenthesis.
With A, ch 38.
Row 1: Sc in second ch from hook and in each ch across, turn.
Rows 2-12: Ch 1, sc in each st across, turn.
*You can begin to follow the graph or continue to follow the rows as written.
Row 13: Ch 1, A (7), B (1), A (10), B(1), A (10), B (1), A (7), turn.
Row 14: Ch 1, A (6), B (3), A (8), B (3), A (8), B (3), A (6), turn.
Row 15: Ch 1, A (5), B (5), A (6), B (5), A (6), B (5), A (5), turn.
Row 16: Ch 1, A (4), B (7), A (4), B (7), A (4), B (7), A (4), turn.
Rows 17-18: Ch 1, A (3), B (9), A (2), B (9), A (2), B (9), A (3), turn.
Row 19: Ch 1, A (3), B (4), A (1), B (4), A (2), B (4), A (1), B (4), A (2), B (4), A(1), B (4), A (3), turn.
Row 20: Ch 1, A (4), *B (2), A (3), B(2), A (4); repeat from * across, turn. Fasten off B.
Rows: 21-32: With A, sc in each st across. Fasten off after Row 32.
*Work a second panel following the same instructions but swap the 2 colors. Color B will now become the main background color (A) and Color A will become Color(B) for the Hearts.
When you are done with the second panel you do not need to fasten off Color A.
Continue to Assembly instructions.
Instructions – Graph 2:
*Every stitch is a single crochet stitch. The number of stitches for each color is in parenthesis.
With A, ch 38.
Row 1: Sc in second ch from hook and in each ch across, turn.
Rows 2-10: Ch 1, sc in each st across, turn.
*You can begin to follow the graph or continue to follow the rows as written.
Row 11: Ch 1, A (18), B (1), A (18), turn.
Row 12: Ch 1, A (17), B (3) carry Bacross for 10 sts, A (17), turn.
Row 13: A (7), B (1), A (9), B (3), A (9), B (1), A (7), turn.
Row 14: A (6), B (3), A (7), B (5), A (7), B (3), A (6), turn.
Row 15: A (5), B (5), A (6), B (5), A (6), B (5), A (5), turn.
Row 16: A (4), *B (7), A (4); repeat from * across, turn.
Row 17: A (3), B (9), A (3), B (7), A (3), B (9), A (3), turn.
Row 18: A (3), B (9), A (2), B (9), A (2), B (9), A (3), turn.
Row 19: A (3), B (4), A (1), B (4), A (2), B (9), A (2), B (4), A (1), B (4), A (3), turn.
Row 20: A (4), B (2), A (3), B (2), A (2), B (11), A (2), B (2), A (3), B (2), A (4), turn.
Row 21: A (13), B (11), A (13), turn.
Row 22: A (13), B (5), A (1), B (5), A (13), turn.
Row 23: A (14), B (3), A (3), B (3), A(14), turn. Fasten off B.
Rows 24-32: With A, sc in each st across. Fasten off after Row 32.
*Work a second panel following the same instructions but swap the 2 colors. Color B will now become the main background color (A) and Color A will become Color(B) for the Hearts.
When you are done with the second panel you do not need to fasten off Color A.
Continue to Assembly instructions.
Assembly Instructions:
Place both panels together with wrong sides facing each other.
Pick up the yarn where you left off on the last panel you made, sc around 3 of the edges, placing 3 sc in each corner.
Insert your pillow form inside the last open edge of the panels.
Sc the rest of the pillow closed. Join with a sl st to the first sc made.
Fasten off and weave in ends.