Adorable Mossy Bunny
The charming Mossy Bunny is a delightful sight to behold, with its soft fur and gentle demeanor. This endearing creature hops around the lush greenery, blending in seamlessly with its surroundings. Its big, expressive eyes and twitching nose add to its overall cuteness, making it a favorite among nature enthusiasts and animal lovers alike. The Mossy Bunny is a symbol of innocence and purity, bringing joy to all who encounter it in the wild. The Mossy Bunny's unique appearance and gentle nature make it a beloved creature in folklore and fairy tales, often portrayed as a magical being with special powers. Whether spotted in a forest clearing or nestled among the moss-covered rocks, the Mossy Bunny never fails to captivate hearts with its undeniable charm.
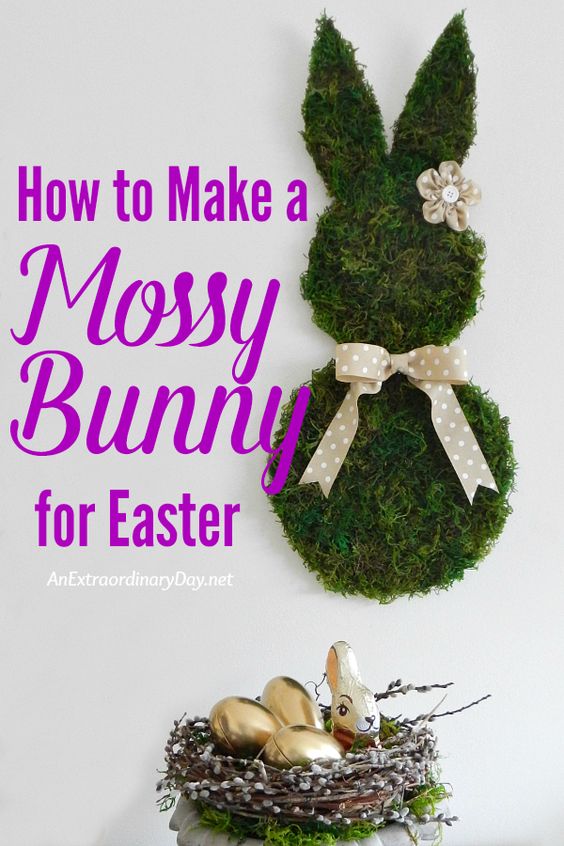
Supplies
- A large sheet of cardboard – a least 20″ long x 16″ wide.
- Marker
- Cutter
- Tacky Glue
– I like this brand because it dries strong and quickly
- Moss (Preserved Moss – not Spanish Moss – Hobby Lobby & Jo-Ann carry it.)
- Scissors
- Hot Glue Gun
& Glue
- Ribbon (I used 1.5 inch wide grossgrain.)
- Plastic to protect your work surface


Assembly Instructions
Choose a combination of plates or bowls from your cupboard that will give you the sizes you need for your bunny’s body. Make her as slim or as plump as you wish. (Note: I picked up my cardboard from Aldi. They always have boxes there when you shop which are handy for projects like this.)
Draw around your plates with a marker and cut out Bunny’s body with your cutter… being sure to keep her head attached to her body.
Also be sure to cut bunny ears. I sketched one out and cut it and then flipped the cardboard and traced on the other side of my large sheet of cardboard and then cut it out. After putting the ears on Miss Bunny’s head I thought they were too big, so I trimmed them down. Ear size is rather subjective in my opinion.

Attach Bunny’s ears to her head. I used a little glue and packaging tape to do that. In the second photo, you can see how they look. The third image shows a loop of bakers twine that I knotted and glued to the back of Bunny’s head at the base of her ears. At first, I attached it with tape, but she fell off the wall, so I re-attached the hanger with hot glue and it’s just fine.

Now it’s time to mossasize your bunny rabbit.
This is such an easy step… cover your cardboard bunny frame with Tacky Glue. Work one segment at a time. I started with the body and after I applied the glue liberally, I simply tore off pieces of the moss and pushed it down on the gluey body. Continue until you have completed cover that body section, making sure that you fill in any gaps where you see the cardboard. Then… continue to the head, and then to the ears.

Now it’s time to flip your bunny on her mossy front and get out your scissors and give her a little trim. Be careful not to trim too close to the cardboard or you’ll be seeing cardboard from the side of her. If you wish… you can always run a bead of glue along her cardboard edge and smoosh some moss on the edges just to be sure.
And then she’s done and ready for her finery.

Miss Bunny is just like you… she LOVES to look pretty. So… I created a lovely neck bow for her with pretty trails and a lovely flower from the same ribbon for her hair.
