Braided Rope Spring Wreath
Hello dear friends! Are you as excited as I am that spring is almost here? As we prepare for the new season let’s make this braided rope spring wreath. It’s a very beautiful wreath and it will welcome spring majestically to your home. Feel free to add flowers of your choice and just have fun with the entire process. Let’s click on the link below to get started. Have fun! Materials needed: Jute Rope - 50ft 10mm Heavy duty craft scissors or craft knife Clear cellophane tape Painter's tape Clamps ...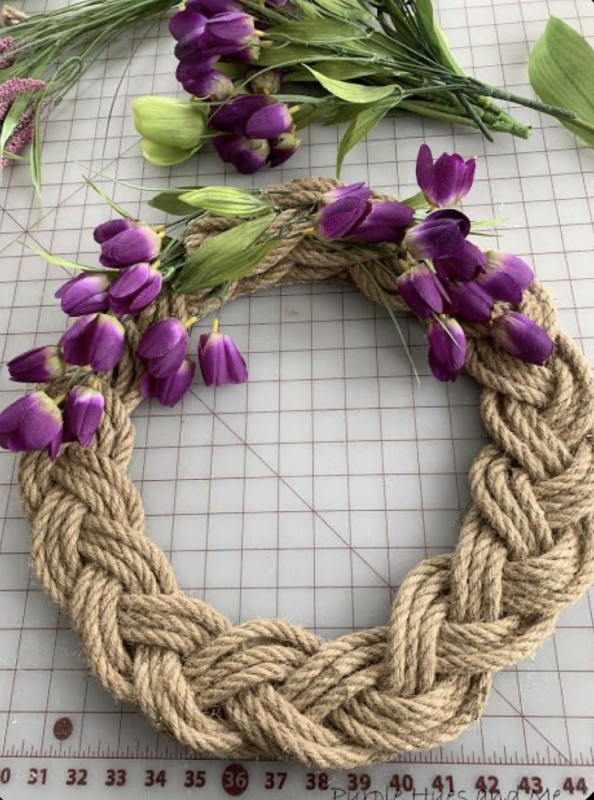
Easy Hexie Pincushion
Hello friends in the house. Here comes a life saving accessory that you must not miss as a serious and hardworking professional and home maker. This Hexie pincushion is a lovely way to keep yourself and your family safe and protected from harm and injury. The tutorial here is very explicit about the process and steps towards making this beautiful pincushion. So, why not just take advantage of it right away and stay safe! Materials needed: small metal tin (approximately 3 inches in diameter) Small scra...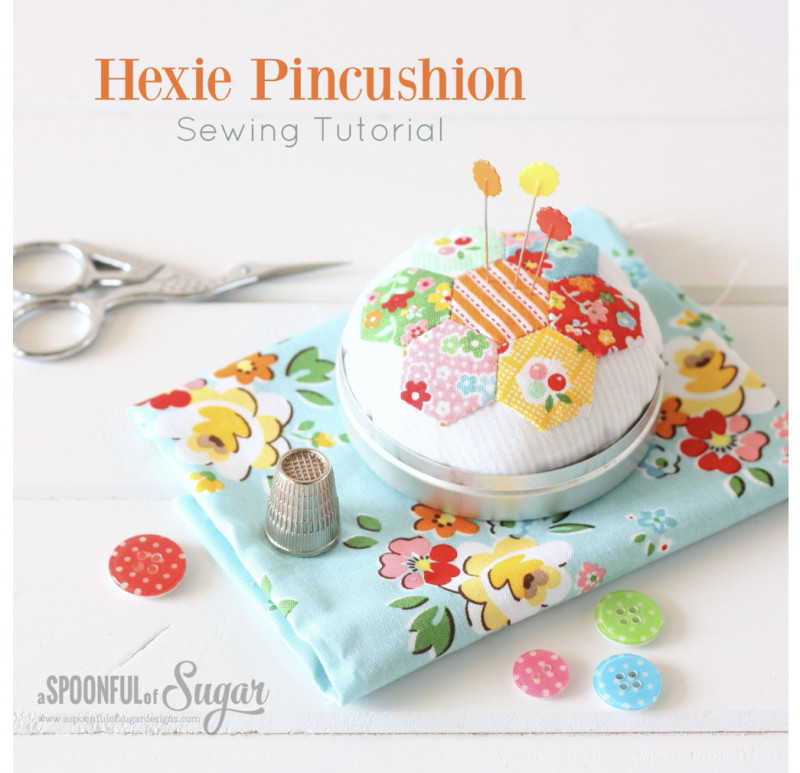
Speckled Robin’s Egg Mason Jar
As we prepare for the new season, let’s make this Speckled Robin’s Egg Mason Jar. This beautiful mason jar is different from the others which we have made. It will be perfect as a vase for flowers in your home and even for gifting flowers to friends. It is a very unique design and is perfect for spring. The process is really easy and even kids can enjoy making this with you. Materials needed: Half Pint Sized Mason Jar Primer in white DecoArt Chalky Finish Paint in Serene and Rust...
Make Zinnia Flowers from Pine Cones
We have done a couple of crafts with pinecones but did you know that if you turned the pinecones upside down you will have an amazing flower looking effect. Today we’re going to make some Zinnia flowers from pinecones and they will be great on your tables and shelves as spring knocks on our doors. The process is really easy and all you need are some pinecones and paint. Have fun! Materials needed: acrylic craft paint pine cones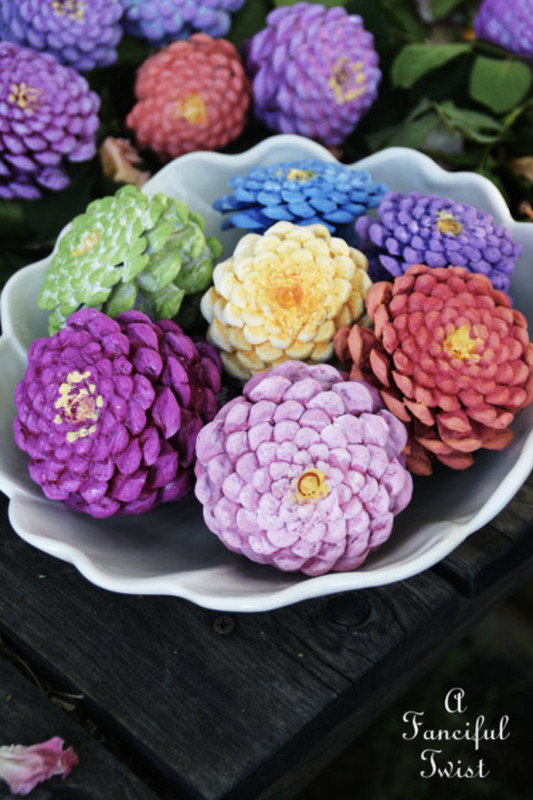
Beautiful Origami Tulips
Hello beautiful people! How I just can’t wait for spring to come knocking on our doors. That’s why today we are going to make some beautiful origami tulips. These tulips are very colorful and are the flowers of spring. Add some flowers to your home decor and let the sunshine come in. It’s time to improve your paper craft skills! Materials needed: Origami Papers Pencils Ruler Scissors Paper Glue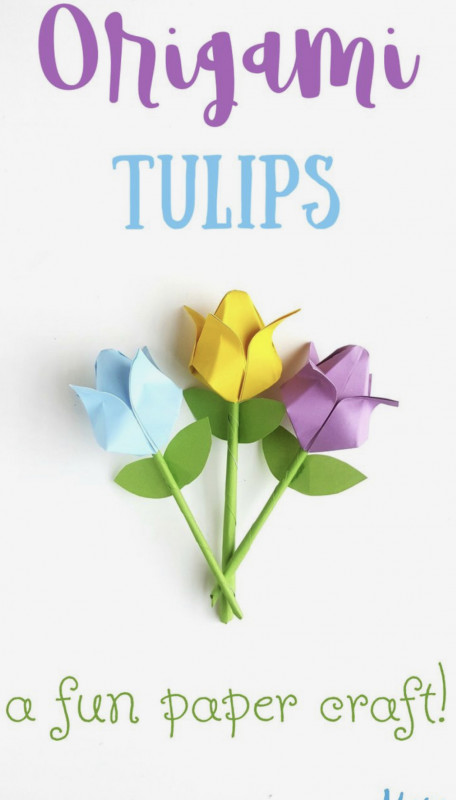
Make a Stickable Bottle Cap Pincushion
Hello craftspeople here. Let's protect ourselves from injuries caused by our work tools.This bottle cap pincushion will also keep your pins and needles away from prying eyes and mouths. It will ensure order and a clutter free workspace. The bottle cap design is a nice innovation which adds more beauty to this almost lifesaving piece! Materials needed: Plastic bottle cap Fabric scrap Fiber fill Thread Small trims (Pom-pom, lace, ribbon whatever you desire) Glue gun and glue Glue for the trim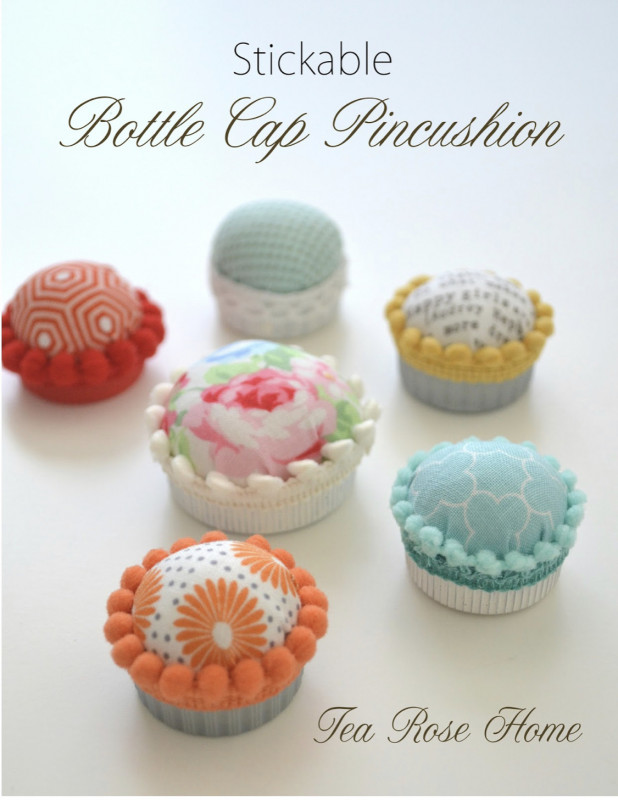
How To DIY a Paper Mug Gift Box
This paper mug gift box definitely makes a gift look very well put together. Isn’t it just the cutest thing ever? Even if you have a party to organize, you can put your souvenirs in this beautiful paper mug. So dear friends and crafts lovers, let’s learn how to DIY a paper mug gift box. I hope you have fun just as I did. Materials needed: scrapbook paper or card, a score board and bone folder, scissors, double sided tape, cellophane bags and ribbon.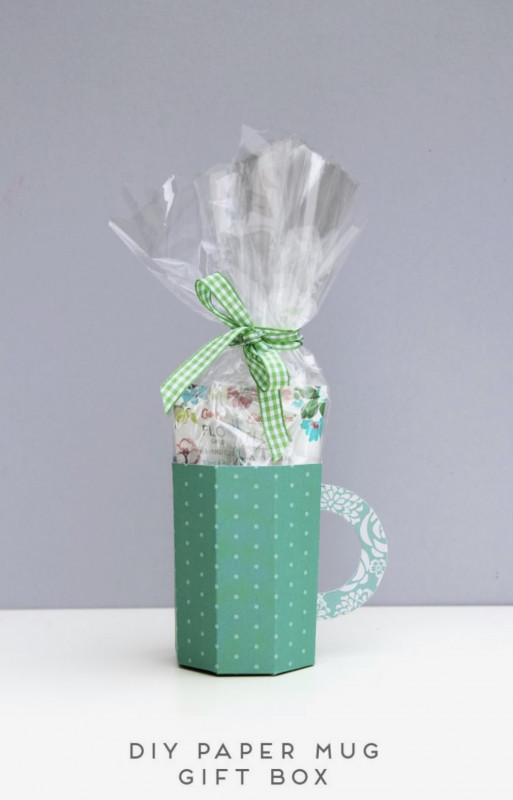
Make Beautiful Eyelet Bound Notebooks
When I was younger I was always making notebooks not only for myself but for friends and family. I often sold them and made some money from that craft. So, to remember those times and share it with you all I have decided to share this amazing tutorial I found. Today we’re going to make some beautiful eyelet bound notebooks. Be as creative as you can be and have fun! Materials needed: Mini Scoring Board Embossing Stylus 1/2″ strips of colored cardstock Eyelets 4 1/4″ x 5 1/2″ text weight pape...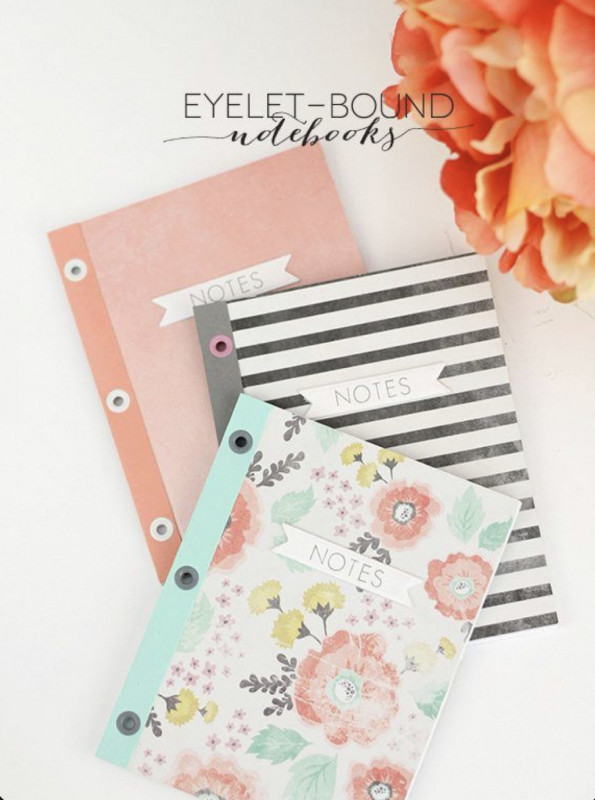
Super Simple Circles Quilt
Hello my dear quilt lovers! How are you all doing today? I hope great! We have another lovely quilt for us here. It’s the Super Simple Circles Quilt. The most colorful thing, won't you say? It comes with a guide to ensure that you can DIY and get the same beautiful finished work! So, click on the link below to get started. Materials needed: Fabric Basic Sewing Supplies 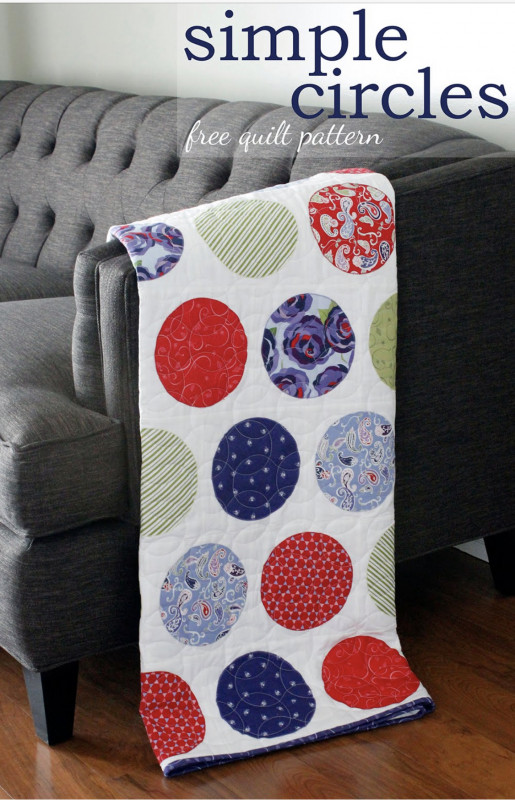
The Easiest DIY Trinket Dish Ever
It’s time for some mod podge crafts. Today we’re going to make the easiest DIY trinket dish ever. All you have to do is get a soap dish or a small bowl, get some beautiful paper napkins, some mod podge and you will be good to go. The final result will definitely add some color and beauty to your interior. Have fun! Materials needed: Porcelain soap dish or small bowl Pretty paper napkins Mod Podge Scissors Paintbrush 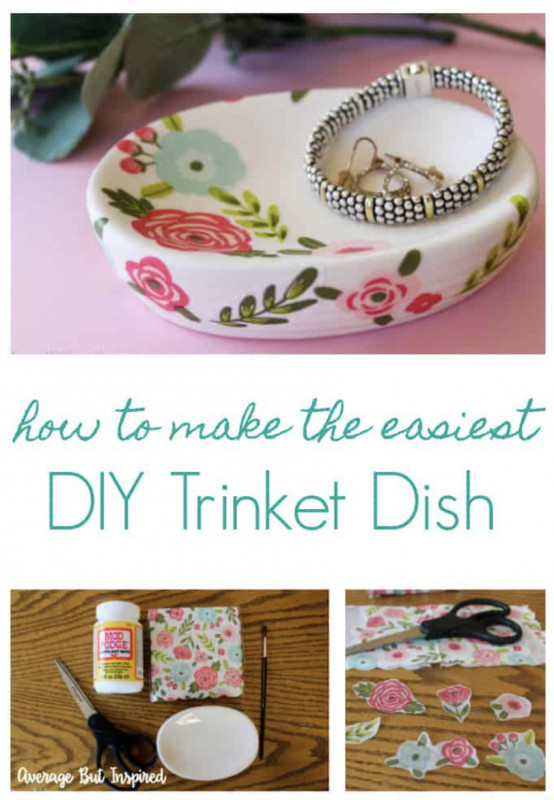
DIY Wooden Door Mat
Welcome your guests and family members home with a beautiful wooden door mat. You can easily DIY this gorgeous home decor. It is very modern and unique. Trust me, you will enjoy the entire process of making this gorgeous piece. It’s like a puzzle you have to fix together to get that amazing final result. Materials needed: 2- 1×6 cedar deck boards @ 10′ Measuring tape Table saw 1/4″ drill bit Cordless drill Sandpaper – 120 grit Heavy duty Jute twine – #530 Thompson’s WaterSeal Timber Oil in...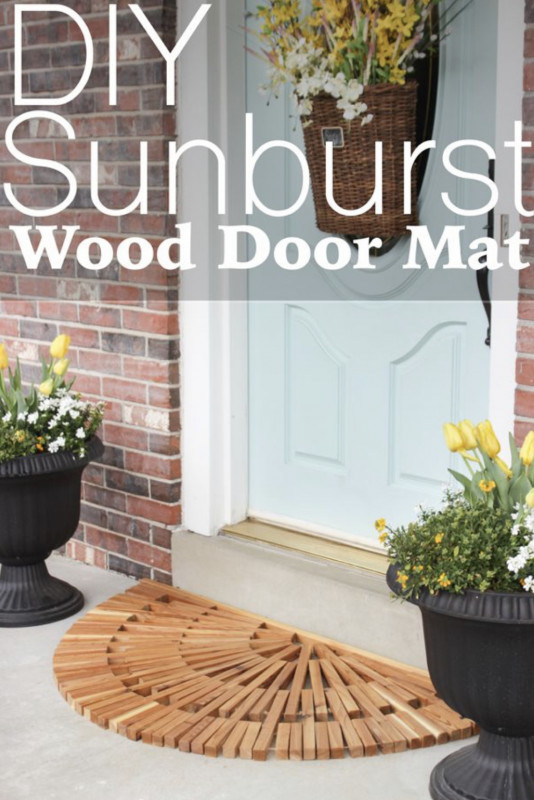
Crochet a Rainbow Modern Granny Blanket
If you have always wanted to make a very simple blanket then this is your perfect opportunity to make one. Today we are going to crochet a rainbow modern granny blanket. This blanket is very colorful and you can make it in any color combination of your choice. I hope you enjoy making this and even if you’re a beginner, you will certainly make a great blanket. Materials needed: yarn size G 4 mm size hook size H 5 mm size hook scissors tapestry needle
DIY IPad Case From Upcycled Materials
It’s time to upcycle those cardboard boxes that are lying around in your home. Let’s use those cardboard boxes to make a lovely DIY iPad case. The good news is that this iPad case can be made with other upcycle materials like old or poor fitting clothes. So, let’s get all our materials ready to begin the process of making this functional case. Materials needed: An article of clothing Cardboard box, sewing machine, scissors, pins, and a ruler Spray mount (optional) Needle and thread (or g...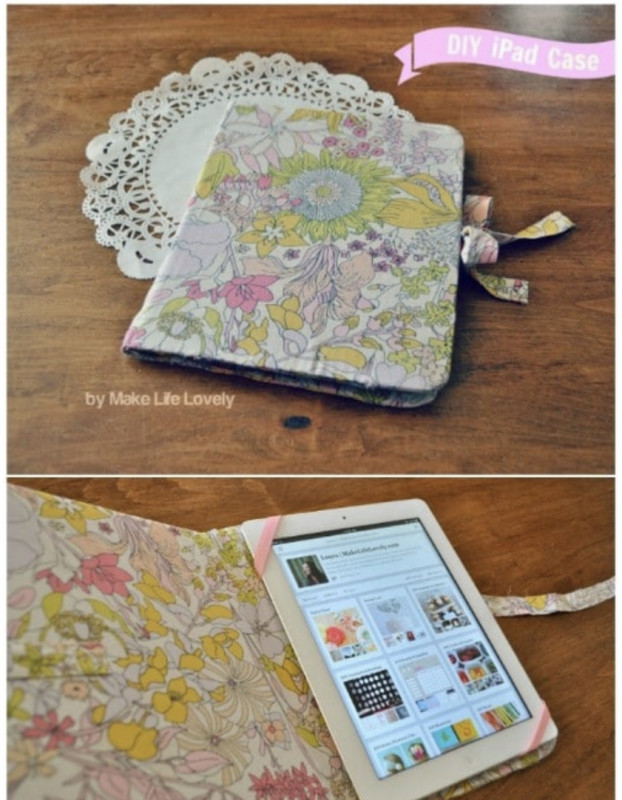
DIY Recycled Cardboard Tube Wall Organizer
It’s recycling time once again! I’m so excited, are you? Let’s put those cardboard tubes to good use in our homes. Let’s make a super easy craft, one that will be perfect for organizing and beautifying our homes. So, let’s make some recycled cardboard tube wall organizers. I hope you have fun making this. Materials needed: Cardboard shipping tubes of various sizes Acrylic craft paint Hot glue Paint brushes Utility knife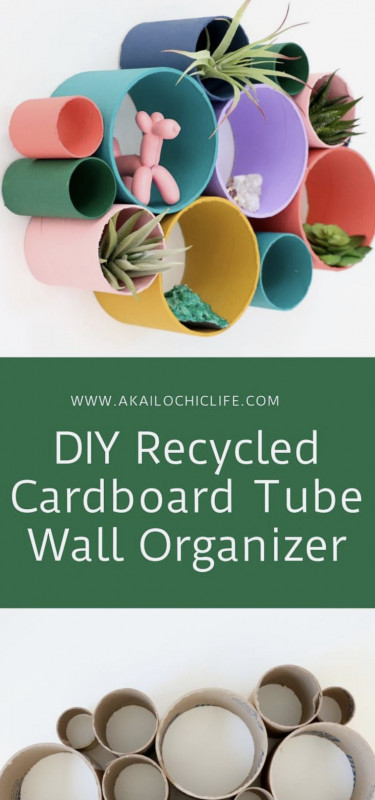
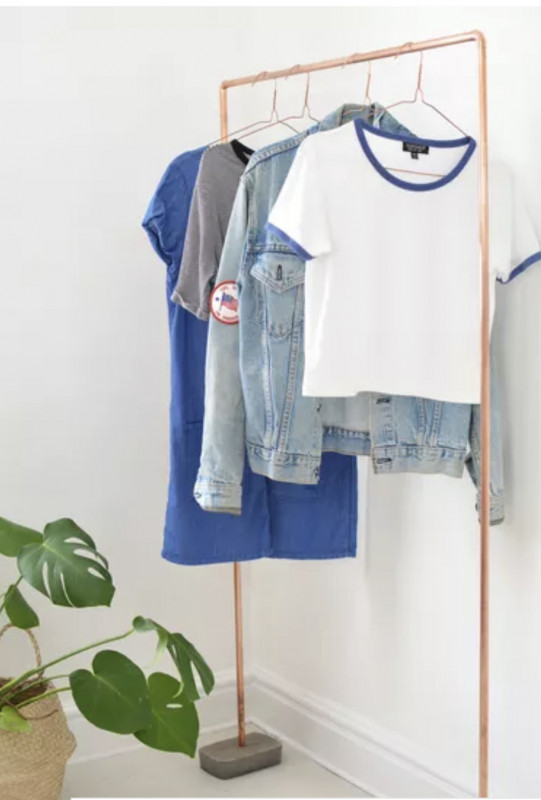
How to Make a Clothing Rack
If you don’t have too much space in your home then clothing racks will be a better option than wardrobes. This clothing rack is perfect for organizing your clothes with minimal space. It will also be perfect in your hallway to hang coats and other outerwear. So friends, let’s organize our homes by making this simple clothing rack. Materials needed: 1/2-inch diameter copper plumbing pipe, 10 feet long (2) Tubing cutter Dry cement "sand" mix Large mixing bowl Tupperware containe...